
The 12 year old blue office chair is the first thing you see when you come down the stairs to the lower level in our house. Yuck!
I saw this tutorial at Made by Meg and knew that I could “just do it”!
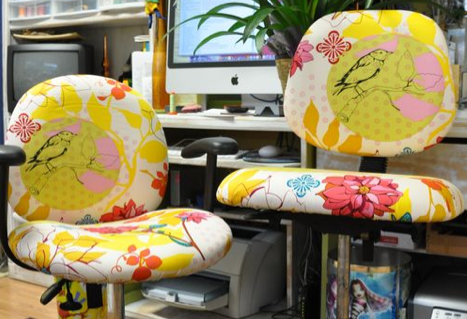
Here is the inspiration photo. Meg’s tutorial showed me the way!

| Photo from Made by Meg |
 |
| Add caption |
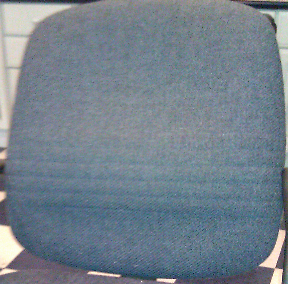
Here is our ugly blue chair!
See why it was bugging me!
You will have to read on to see how it turned out!
I would have picked something like this from the Piece O’Cake Blog.
But since I figured I wasn’t the one who would be sitting in it…..I played nice and picked this fabric!

This was one of those projects that ended up being way easier than I thought it would be….a nice surprise!
Seriously, if I hadn’t gotten all OCD at the end about the finishing, I could have been done in less than 2 hours!


The original seat was wrapped with an elastic binding that was not attached to the actual chair….kind of like a shower cap.
That made it easy to just pinch and tuck the new fabric around and underneath the old stuff.

Now I had to decide how to attach it.
I considered using my trusty glue gun….and that would have worked.

But since I have my wonderful compressor and stapler I decided to see if I could staple into the cardboard frame. (I never said this was a quality chair)

That worked very well…giving me the ability to stretch and tuck all the way around.
Once that was done….I was too impatient to wait for “man” power and I put the chair back together with only “woman” power….I am sure John will “check my work” before he sits down!
Here is the chair in my workroom!


From
FADED
PILLED
REALLY UGLY


AND…..I won’t be needing to choose a conservative fabric for this!
What do you think of these?


I am linking to these link parties, go take a look at the great ideas out there!
Fireflies and Jellybeans
Craft Junkie Too
504 Main
Miss Mustard Seed
Under the table and Dreaming
Craftomaniac Mondays
Amaze Me Monday
A Round Tuit
Nifty Thrifty Tuesday
Take A Look Tuesday
Tuesday Time Out
Tootsie Wootsie Time Out
Wicked Awesome Wednesday
The Kreative Korner Tea Time Thursday
Home and Family Friday Linky Party
Not Bad Sundays
20 Below Thursday
Sumo’s Sweet Stuff
tip toe through Tuesday
Hello…new follower from the COJ hop. Your chair came out fabulously! I did a similar project on a computer chair we were given for my daughter's room. I was re-doing the decor and all in her room and the chair did not match anything (quite ugly at that)! So I spray painted the base and made cozies for the seat and back. Came out fabulous! I was a happy camper.
What a great transformation, my husbands office chair really needs a makeover, I just need to make a start! I ma now google friend following you, Karima x http://www.karimascrafts.com
Hi! I am your newest follower from the
blog hop! I would love it if you could follow me back
and we become bloggy friends! 🙂
Have a lovely day,
~meg~
a meg moment
http://agemmoment.blogspot.com/
PS
Love the chair!!!
Great job on the chair. I wish I was handy. I would simply get frustrated and give up. Now following you from Footloose and Fancy Free. Have a great weekend!
The chair turned out really pretty! You have some skills there, no joke:) I'm glad I discovered your blog and I am now following you thanks to Footloose and Fancy Free, and it would be so nice if you could share the love back on my blog;)
Also today we have the coolest blog hop there is… no rules just fun and would love you to join in with us at Boost My Blog Friday, where you can meet lots of friends and have a great time:) See you there!
Happy Friday!
I like it! I'm looking forward to seeing your prettier chair too – I like the last two fabrics best.
Thanks for the shout out! I am glad I inspired you to recover you chair too! 🙂
– Meg from Made By Meg
PS the link to my tutorial is: http://madebymeg.net/blog/diy-recovering-an-office-chair/
In case anyone is looking, the link in the post above is only to my homepage. 😉
Thanks Meg…you really did get me going! I am glad you directed us to the right page for the tutorial. But….I love your whole blog…so there!
Love the makeover. I have a chair desperate for a similar treatment but I've been too scared to tackle it. Can't wait to see your sewing chair – all the fabrics you picked are gorgeous.
This is helpfull, I have to dress up one for my brother. Tnx for tips…
Great re-do of the chair! Looks like new! Have fun making a funky patterned and coloured one for yourself!
Thanks for linking to a Round Tuit!
Hope you have a great week!
Jill @ Creating my way to Success
http://www.jembellish.blogspot.com/
This looks great and thanks for the links to all the how-to's! I have an ugly chair that I use for sewing that might just need this kind of attention this week!
Great job! I may give it a try!
Here from Diann's Thrifty Friday
What a transformation! I know just what kinda chair you recovered, they are all over the place, and most get thrown away, great idea to recover them! Thanks for linking this how to up at Eat, Grow, Sew!
Great job!
Must have been a tough job but you did it well.
Thanks for linking up at Tea Time Thursdays @ Kreative Korner and adding to the fun.
The party for this week is going on… hope to see you there again 🙂
http://tanyaanurag.blogspot.com/2011/09/tea-time-thursdays-5-and-features.html
Hi dear its very nice blog and your post on blog is very informative I would like to visit on your blog again and again. It’s very effective and attractive your blog theme is according to your blog title.Chair Manufacturers in Delhi, Office Chair Manufacturers in Delhi
Well done, woman! Can't hardly wait to see which gorgeous fabric you pick for the next chair…I love them all. Hmmmm, I need to take another look at my own chair now.
Hi there. Nice blog. You have shared useful information. Keep up the good work! This blog is really interesting and gives good details. Office Chairs India, Office chair suppliers in Delhi.
Love the makeover. I have a chair desperate for a similar treatment but I've been too scared to tackle it. Can't wait to see your sewing chair – all the fabrics you picked are gorgeous.
Office Chairs
What a great transformation, my husbands office chair really needs a makeover, I just need to make a start! I ma now google friend following you, http://www.sitbackandrelax.com.au..
Thanks for sharing with us.
Office Chairs
I'm loving this makeover…especially because those desk chairs always seem to be so disposable for most people when all they need to do is a simple up cycle! Well done! 🙂 you should enter your up cycle in Craftbaby's "Upcycle Challenge"! http://www.craftbaby.com/contests/3/upcycle-it-sweeps
This comment has been removed by the author.