knock-off

Permanent Botanical Decor! Say What?

I learned a new fancy name for “fake flowers”. You can now call them  “permanent botanicals”!
You all know how much I love fresh cut flowers!
The whole idea of our little Sweetwater Floral business is about fresh flowers on a budget!
BUT….
Lately there seems to be a lot of buzz out there about using permanent botanicals.
Permanent botanicals have come a long way from the plastic posies that we love to hate!

 Around Sweetwater….Faux Florals
White Hydrangea with real and artificial greens.

 The purple Hydrangea blooms mimic the way real ones dry.
I added real greens here too.

The close up of the tulips show them up for what they are….not so wonderful as a centerpiece.

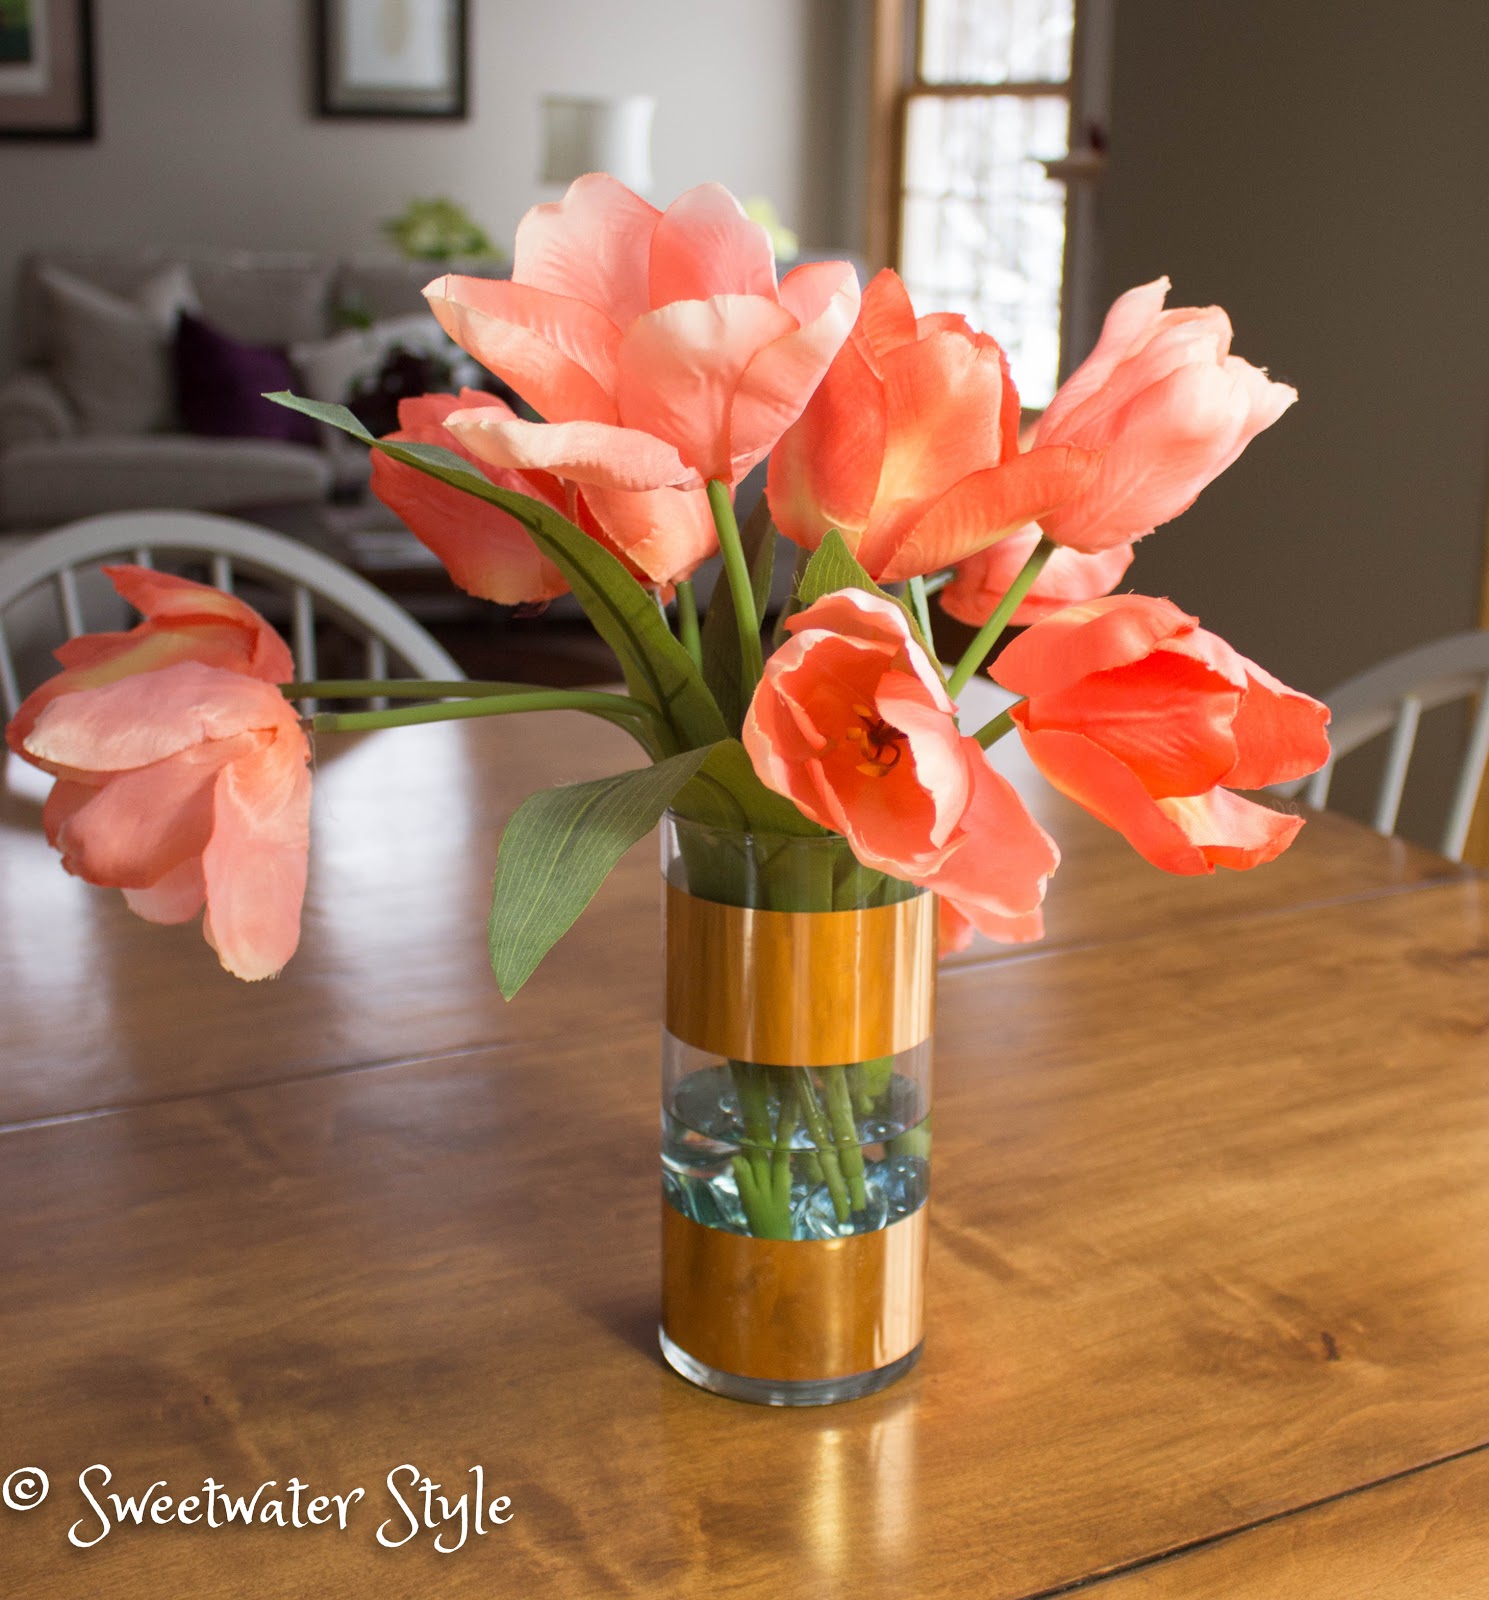
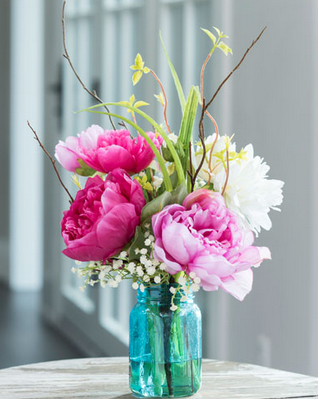
BUT….tucked in a corner and arranged to mimic the way real tulips fall over….they look better.

Notice the water in the vase….to fool they eye!

When one of our brides wanted peonies in her bouquet….in NOVEMBER….
we used a couple fabulous faux blooms that had a lot more staying power than the real thing.
I would have to say….stunning!

 These artificial blooms can be found at thrift stores and craft stores like Michaels and Hobby Lobby. When you look at the thrift store blooms you need to keep an open mind. Those aubergine hydrangea were part of a god awful arrangement that I took apart. Keep and eye out for greenery too.

Stores like Home Goods and Pottery Barn sell very realistic arrangements.  You will pay dearly for them but it may be worth it.  Watch the sales at Wayfair and Joss & Main too.

HINT: Take a look at how these expensive arrangements are done.  Then you can copy them with your own cheaper versions.

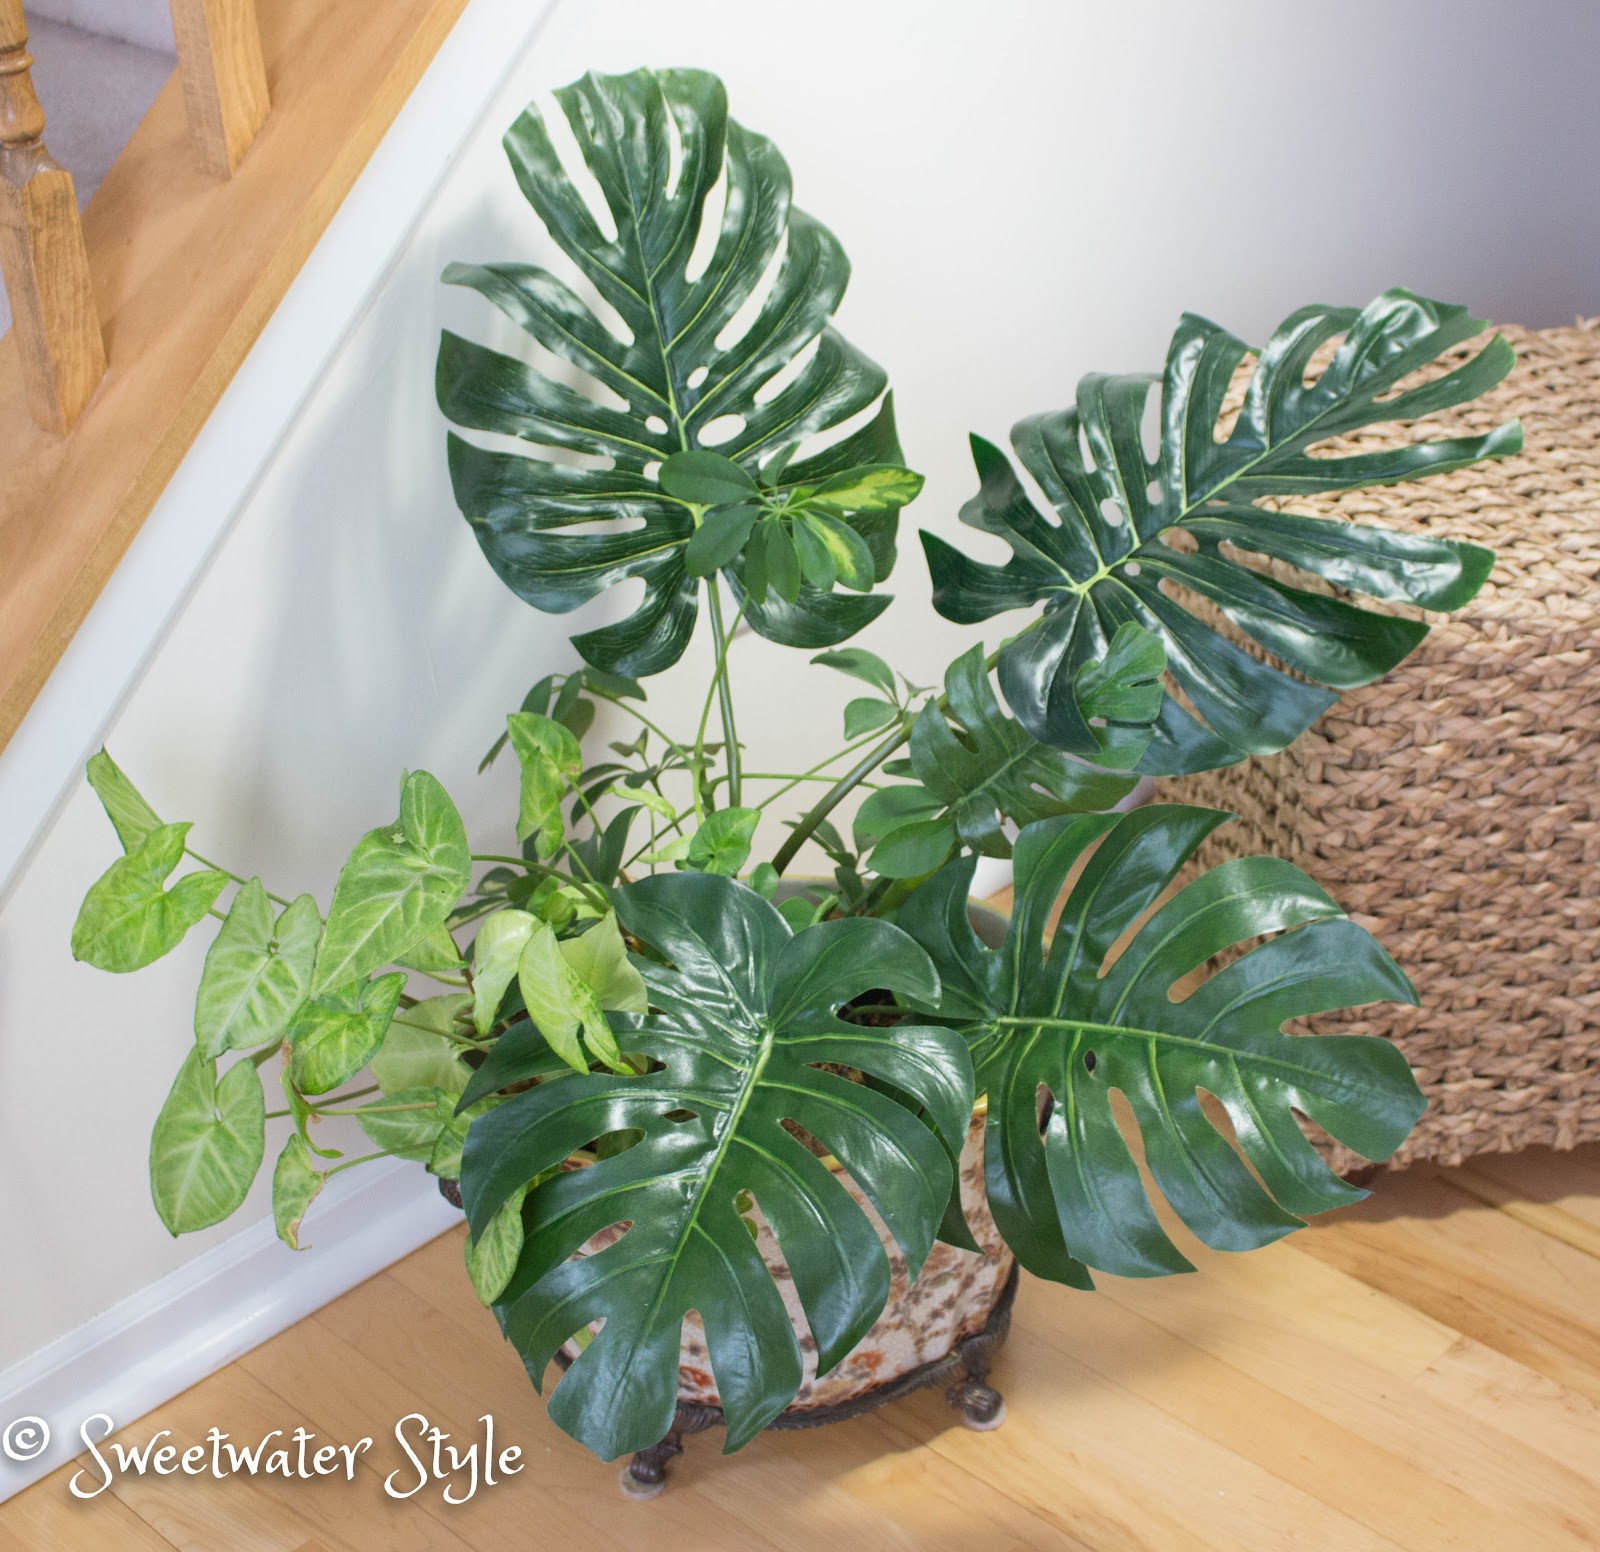
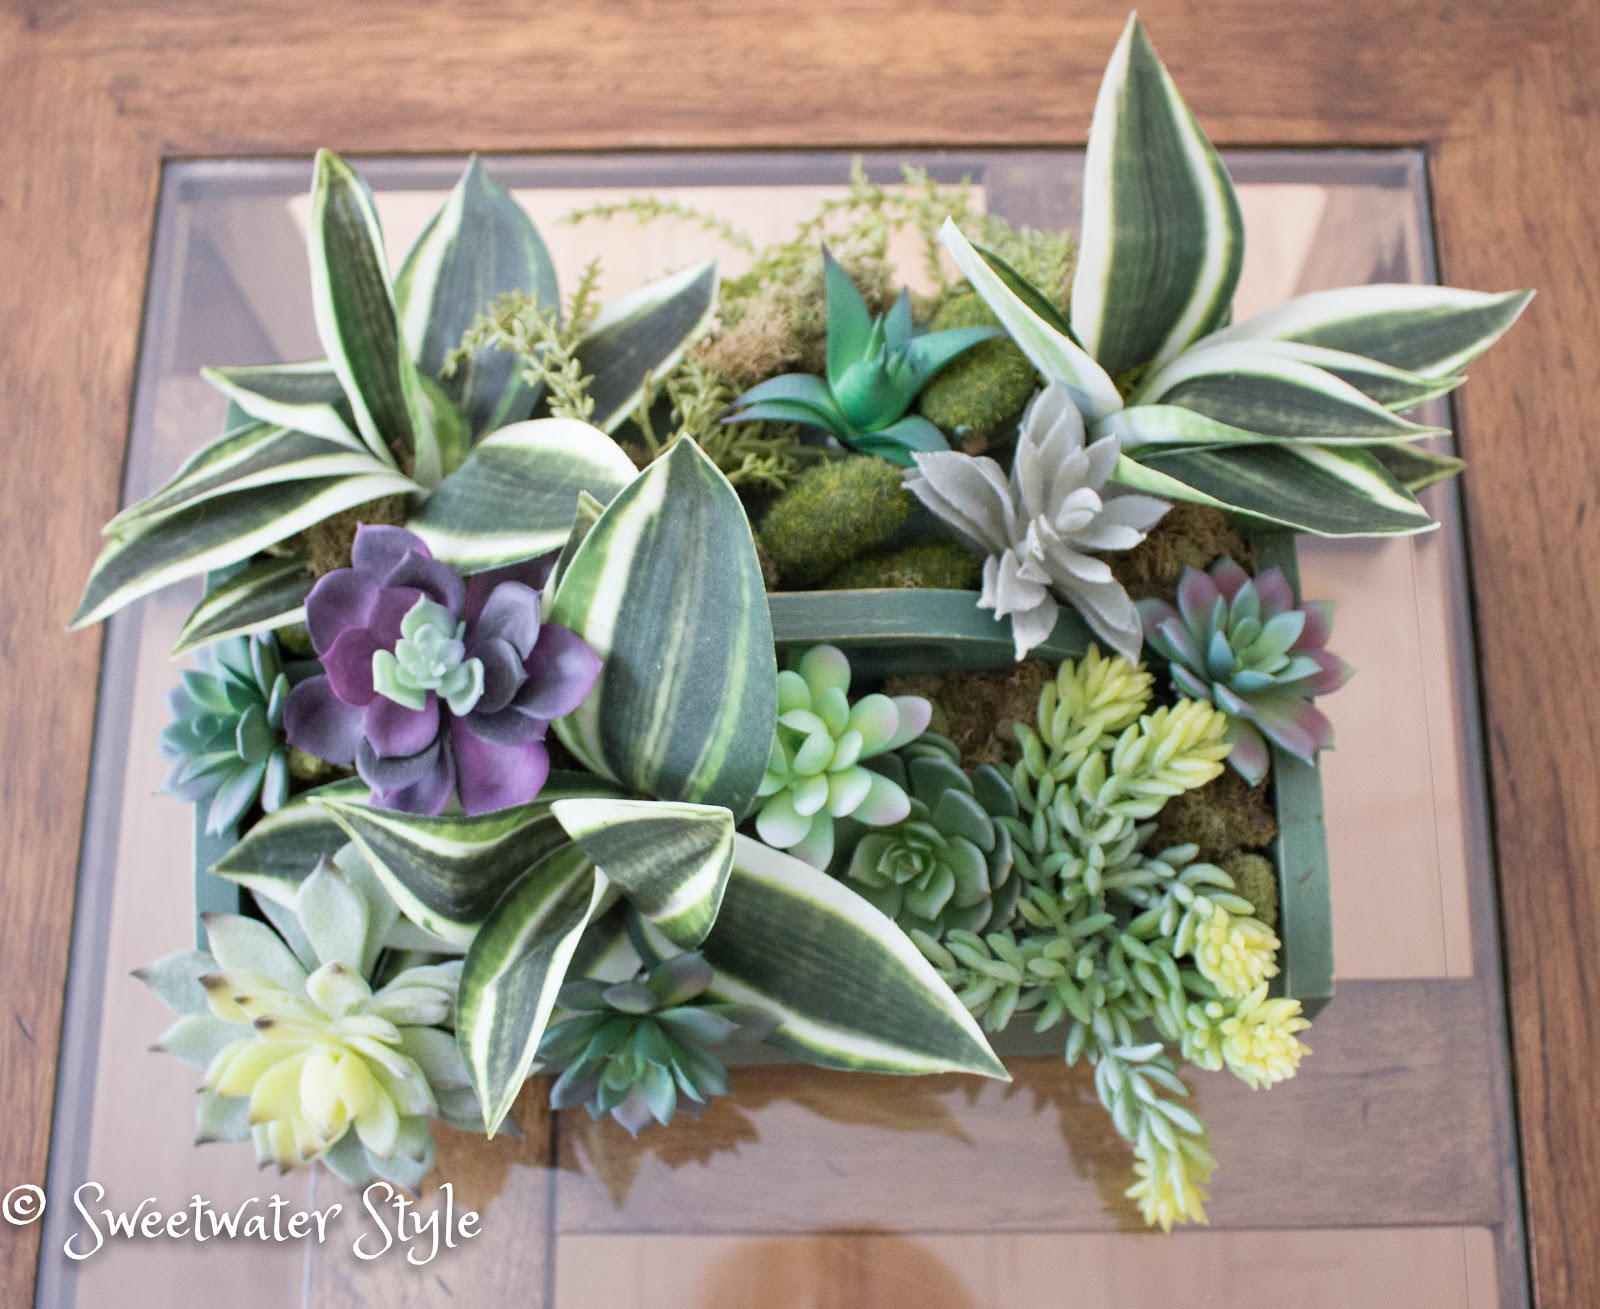
And then there are fake plants!  They have always had the worst reputations. I always think about them tucked way up high on a shelf gathering dust.  I have been noticing lots of permanent greens all over…..Target, Pottery Barn, IKEA…..

I got these gorgeous Monstera leaves in the Target clearance aisle.
They look pretty nice mixed with the real potted plants.

I scored a “grab bag” of succulents at the thrift store.
This little succulent garden could certainly fool you into thinking it was real.
My live succulents never do very well indoors….so this is a nice way to have the look.
The Dollar Store is a great source for mini succulents.

 I know that I will never “really” be satisfied with only using permanent botanicals ….no matter how fancy the name sounds.

I learned some tips and tricks while I was doing my research or this post.
If you decide to go the FAUX route, you might want to check out these links.

  • Real vs. Fake Plant Quiz 
    • See if you can tell the difference between these high quality fakes and the real thing.  Great ideas for “staging” your plants.
  • Petals.com
    • Take some time to look at all the examples of the arrangements they sell.  You are sure to be inspired.


I don’t expect that I will be moving to the DARK side and using permanent botanicals more often than real ones.  There is something so decadent about gathering an armful of blooms at the grocery store or florist.  And hey….everyone needs at least ONE vice!

I will however keep my mind (and eyes) open for ways to use the permanent flora around Sweetwater.

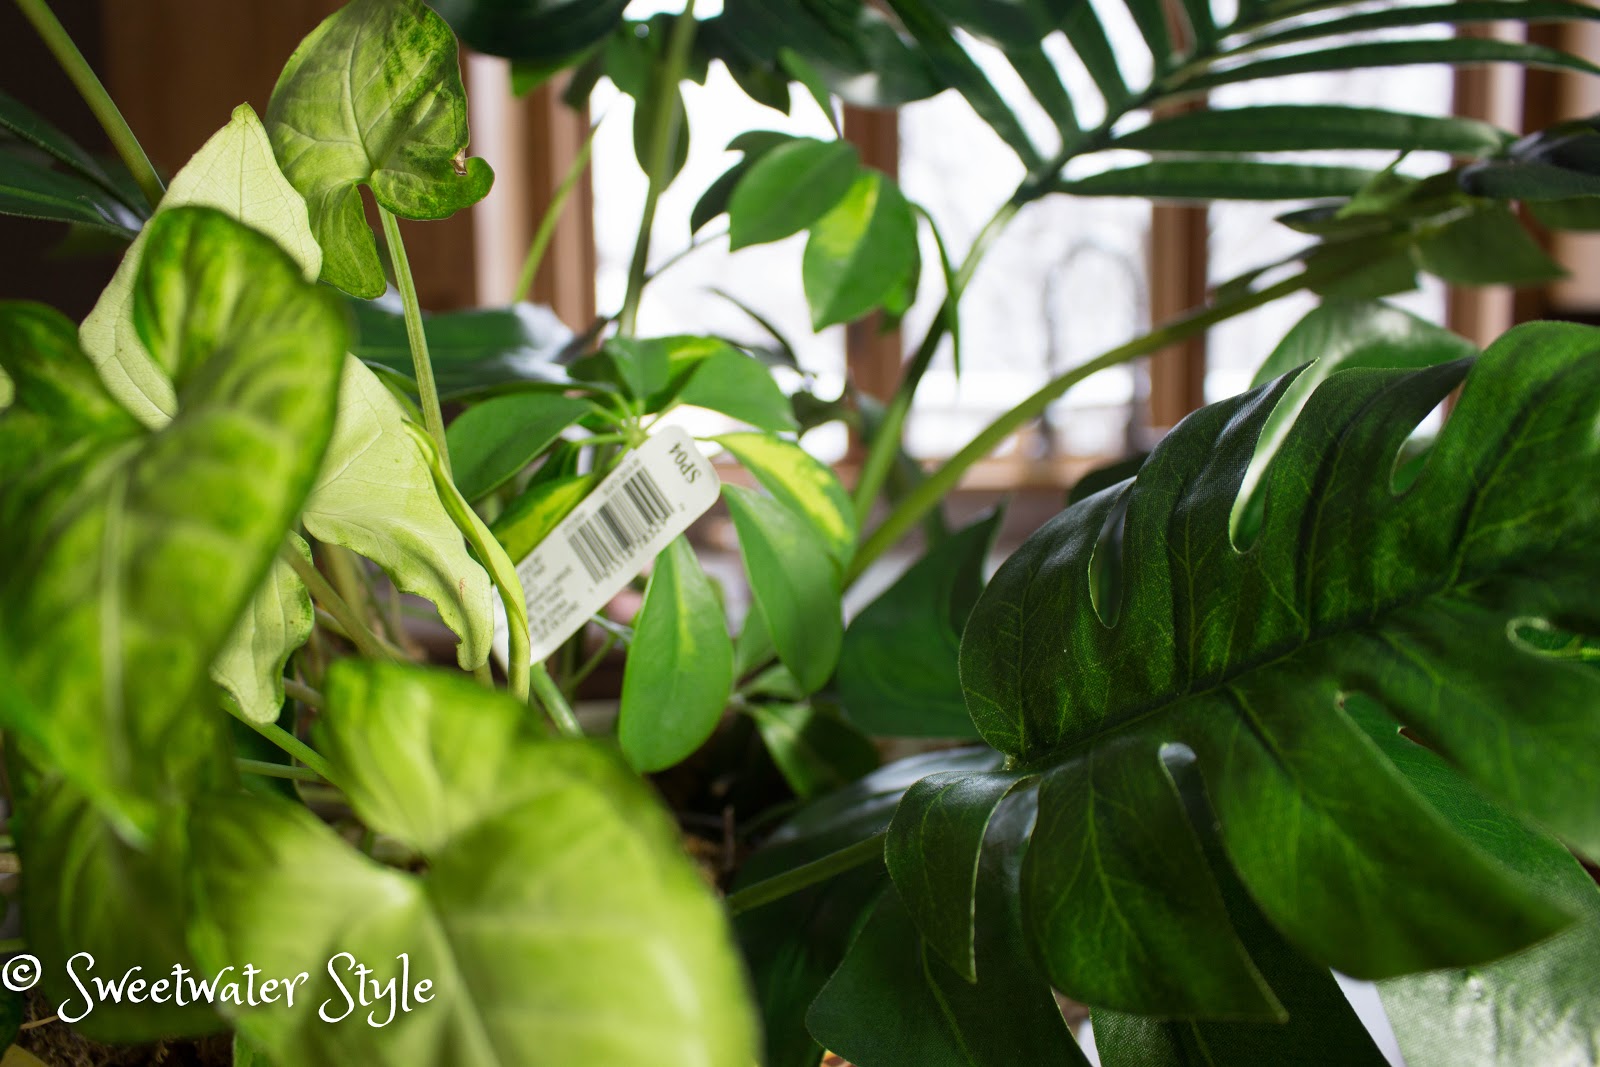
Oh…one last and very important tip: Be sure to remove the tags on your purchased greens!

Have A Great Day!

These Chairs Have History!

You know the old saying, “everything old is new again”?
The idea that mid-century modern furniture is uber popular kind of makes me smile.
You know….that stuff we thought looked so tacky in our parent’s living rooms…..??
That is the stuff our kids lust after at Wayfair and West Elm.

Like this:

westelm.com

overstock.com

Well…..
Look at these chairs!

They may not have quite the same “fancy-ness” as the West Elm or Overstock versions, but they have something that I like even better!

They have HISTORY!

One of the chairs actually came from Coffman Memorial Union at the U of M!

It was given to us by a friend who somehow “liberated” it sometime in the late 1960’s! 
I have fond memories pulling a couple of these chairs together to take a study break while I waited between classes.  So when we had the chance to have one to furnish our apartment, we jumped at the chance.

 Through the years, the single chair got lots of makeovers.  New cushion covers and even a coat of white paint.  I was never able to discard it….but always tucked it in the corner.

The other chair doesn’t have quite as clear a provenance.  It was a streetside rescue…..saved by the Sweetwater Daughter a couple of decades later!

It only made sense that our old chair would join the “new chair” in her house…
Until…..
She found some new chairs and wondered what to do with these treasures…

I knew!
….a trip to the fabric store was in order.
This really nice faux leather was perfect. Maybe I should call it VEGAN leather?
Anyway….the color was perfect and it would also solve the problem of cat hair on the cushions when company comes.  Just a quick wipe and even people wearing black can sit on them.

 The project of recovering them was a combination of wrapping and sewing.  This is one of those times when a “tutorial” doesn’t make sense.  Every chair project is different.  My advice to you if you want to try something like this….just start!  Worst case….you can take it to a “real” upholstery shop.

 I think these were worth the effort!

Now…when people lust over “vintage” furniture…I can smile and know I have the real deal in the living room

In case you were wondering about the difference between antique, vintage and retro, read on!
Here is what the good folks over at Apartment Therapy have to say!
OFFICIAL DEFINITIONS:
What is antique?
According to Merriam Webster, an antique is “a relic or object of ancient times” or “a work of art, piece of furniture, or decorative object made at an earlier period and according to various customs laws at least 100 years ago.” Ruby Lane, an online marketplace of independent antique and collectible shops, offers a similar definition, explaining, “Most authorities consider the actual definition of the term ‘antique’ to mean an age of at least 100 years. If an item is not definitively datable to 100 or more years in age, it should not be directly referred to as an antique.”
What is vintage?
If antiques are things that are 100 years old or older, what are vintage pieces? The defnition of vintage is trickier. According to Merriam Webster, the term vintage relates primarily to wine and is an altered form of the French word vendage, meaning “the grapes picked during a season.” One of its secondary definitions is “a period of origin or manufacture” (e.g., a vintage 1960s Mercedes) or “length of existence: age.” Ruby Lane provides a much more helpful explanation, noting that “an item described as ‘vintage’ should speak of the era in which it was produced. Vintage can mean an item is of a certain period of time, as in “vintage 1950’s” but it can also mean (and probably always should) that the item exhibits the best of a certain quality, or qualities, associated with or belonging to that specific era. In other words, for the term vintage to accurately apply to it, an item should be somewhat representational and recognizable as belonging to the era in which it was made.” Ruby Lane also suggests that ‘vintage’ should not be used in reference to objects less than 20 years old.
What is retro?
According to Merriam Webster, retro is “relating to, reviving, or being the styles and especially the fashions of the past : fashionably nostalgic or old-fashioned.” Retro furniture may not actually be old but it references styles of the recent past. Retro can also mean something that is not very old but is old enough to be more than just “so last season”. (i.e., the woman wearing the early 80s high-waisted jeans because she hasn’t updated her wardrobe since the Reagan Administration is not retro. She is just outdated.) I am still not entirely clear on the difference between retro and vintage, I must admit. There seems to be some overlap. For whatever reason, “retro” makes me think of mod, geometric shapes and “vintage” conjures up images of faded, floral fabrics. But that’s just me!

Good to know!

Tee Public

Have A Great Day!

How To Build DIY Industrial Shelving

All great DIY projects have a back story to them.
This is the story of the DIY shelf over the television in the Sweetwater family room.

Once upon a time in the “Sweetwater Castle” the “Queen” decided it was time to repaint.

With the help of a wonderful painter….the yellow walls became a beautiful “griege” color.

All was well in the kingdom of Sweetwater…..

UNTIL….the “Queen” noticed the big blank wall above the television.

“This will not do!” she decreed.

She called for advice from the “Princess”,  who suggested a floating shelf as the “crowning” accent for the wall.

“It shall be done,” commanded the “Queen”.

What follows is the “real” story behind this fairy tale!

 I was thrilled when the Sweetwater Daughter gave me the perfect shelf for Christmas…..
well…since it was on back order….she gave me a “picture” of a shelf!

Hey…you might be saying….that isn’t very DIY !

The deal was…..the shelf never arrived.
With much follow up and a bit of confusion, the order was cancelled.

Now we are ready for the DIY part.
I decided I wanted to have the look of the exposed galvanized pipe and board shelf.

Hey….we could do this!

Mr. S …or the “King” decided that it would be almost the same price to order the pipes already made as opposed to piecing them together.  We got two pipes from the OverTheLedge Etsy Shop. 

And they sat waiting for the shelf….and they sat and sat and sat.

After a couple of months…..we headed out to get the board.
That meant a trip to HomeDepot and Menards…..
We bought stain too.

And THAT sat and sat and sat.

*Disclaimer:  Sweetwater household projects were necessarily interrupted by several trips and other diversions.

Then one day…..we decided it was time!

We measured carefully and then measured again and those pipes were fianally put up!

We went to get the board out of the garage to try it out before sanding and staining.
OH MY!

And…we learned that there is no way that a board from a big box store can age and stay completely flat!

Mr. S headed to “a real woodworking store”.

He purchased a lovely piece of red oak that hardly needed any sanding.
It was cut to size….and stained.

This board is PERFECTLY flat and straight.

This project was really not that “thrifty”.   You could probably buy one from a store for about the same or less cost. 
The lesson learned….do your research about whatever shelving you decide to use for whatever project you are doing!

If you do want to tackle this Industrial Shelf look for your house: Great Tutorial…step-by-step…clear and concise.  Cherished Bliss has done a way better job of the process than I ever could.  (Especially because I never remember to take photos during the project!)

The REAL moral of this cautionary Fairy Tale is:

Have A Wonderful Day!

You Can Upscale Carnations To Look Like Expensive Flowers

source

Do you hate carnations?
If so, you are not alone.  I used to hate them too!

People….it is time to stop your flower snobbery and consider this lowly flower.

As flowers go, you can’t find more affordable and long-lasting bloom…or one that come in such a wide array of fantastic colors.  (NO….not the strange dyed colors….but the real ones)

source

If you want an upscaled look for carnations….you have to think beyond sticking one flower in a bud vase….

In fact…..there are ways to make carnations resemble expensive flowers like Hydrangeas and Peonies!

I bet that got your attention!

These green carnations are two weeks old.  They are left from an event we decorated for on June 17.  While I made small arrangements from the old ones…..Mr. S asked me where the hydrangeas came from!  Granted….he was across the room…..but still!  So I wondered if I could make these look even more like Hydrangea!

 Hydrangeas are big and fluffy…..so I used 3 carnations.  It was just a matter of using floral tape to hold them together.  Not bad for 2 week old flowers.  HMMMM…..what do you think Hydrangeas would look like after 2 weeks?


 Well….then I decided to try to make carnations look like PEONIES!
 Peonies are not just expensive…..the season is super short.  When the Peonies at Sweetwater bloom…I feel so “rich”….but alas….the season is over for another whole year.


 How cool if I could replicate the look with some humble (CHEAP) carnations!
 I learned this on the website here: Little Dairy on the Prairie…..and here at Mighty Girl.

 They only had mini-carnations at Trader Joe’s.  I figured it wouldn’t matter if my faux peonies were “minis”.

 It is important to open up a carnation by rotating the green base of the flower between your thumb and forefinger.

You should do this whenever you use carnations.

Group the flowers together and fluff them together.

Use a bit of floral tape to hold them in place.

Fluff some more to pull the petals apart a little.


 The faux Peonies may not be perfect replicas…..but the impression is right….as is the price!

Here are some other stylish ways to use carnations instead of more expensive flowers:

source

You know…..I think I may be starting to believe in REIN-“carnation”!
Oohh!  I just couldn’t resist that one!

Have A Great Day!

Link Parties
Nifty Thrifty Things
Coastal Charm

Use What You Have Fall Arrangement

Oh so many years ago…20 in fact….one of my favorite TV shows was The Christopher Lowell Show.

 Do any of the rest of you remember this show?

It had to be one of the first home improvement, DIY, lifestyle shows.

I loved his quirky point of view and sense of style.
HMMM….sound like anyone you know?

I would have to say that many of the things that Christopher featured on his show are things that I still do.

One of those things I remember was the suggestion to copy the look of  hotel lobby floral arrangements.  These displays tend to be done on a grand scale.

This is a photo of the lobby of the hotel we stayed at in Manila…
I couldn’t find the photo of the hotel lobby in Bangkok with the boat made entirely out of orchids!
That probably isn’t something I could pull off….but it was gorgeous and certainly GRAND!

This week we had our family room, hallway, entryway and kitchen painted.

That meant taking every speck of “decor” down in those areas.

This photo is from the post I did about the RULES for a mantel.
I did this in April….so you know it was time for a change.

Once I took the tall dried materials out of the vases, it was time to  go into a “Use What I Have” mode.

This is the result!

I started with one of my favorite containers.

This is a Good Will find that usually has a green plant in it…

A chunk of chicken wire went into the bottom to support all of the sticks.
I love this technique because it is sturdy, cheap and almost disappears in the finished design.

Then it was just a matter of deconstructing the old mantel arrangement and going on a hunt for other things that would add to the tall dried stalks.

HMMM…..didn’t I just write a post about preserving cattails?  (Yes…Mr. S…..the blood was worth it!)
Those cattails are a nice addition.
I also used the seed pods and lichens that have been plant accents for a couple of years.
The final touch is the dried green Hydrangeas tucked in to the base to completely cover the chicken wire.

My arrangement isn’t quite as grand as these….. 

But I like it!

Have A Wonderful Day!