projects

How To: Asymmetrical Floral Arrangement

Loose, unstructured, asymmetrical floral designs are on trend right now.

Sweetwater Floral did the florals for a country wedding last weekend.  The bride asked for an unstructured bouquet and some added texture with little succulents tucked in.

Creating a loose, “messy” bouquet should be easy….right?
Not so much….it is actually more difficult to let the flowers cascade and flow than to tightly fit them together in the traditional nosegay!
I guess we pulled it off though!

Your vocab lesson: two words starting with A.

asymmetric: adjective. not identical on both sides of a central line; lacking symmetry:

armature: a metal framework on which a sculpture is molded with clay or similar material.
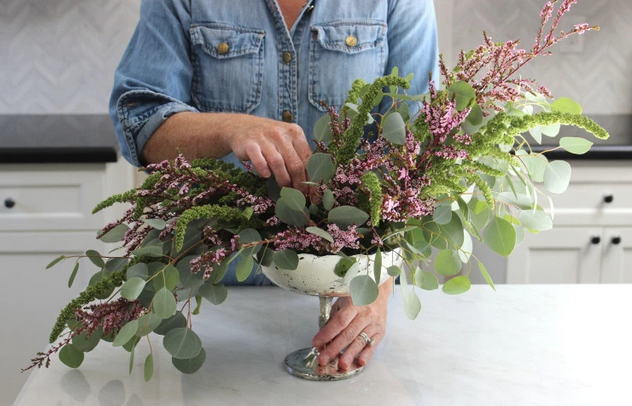
There are always a few flowers left after we do a wedding. I decided to use the leftovers along with a new bunch of carnations to create an asymmetrical arrangement to enjoy here.

I also wanted to play around with using a wire armature to support the stems and let them cascade. 

Flexible floral wire in pretty colors is available at the Dollar Store.
It is a simple matter to twist it around in a loopy way and tuck it into the floral foam.
This gives a pliable “frame” for the stems.
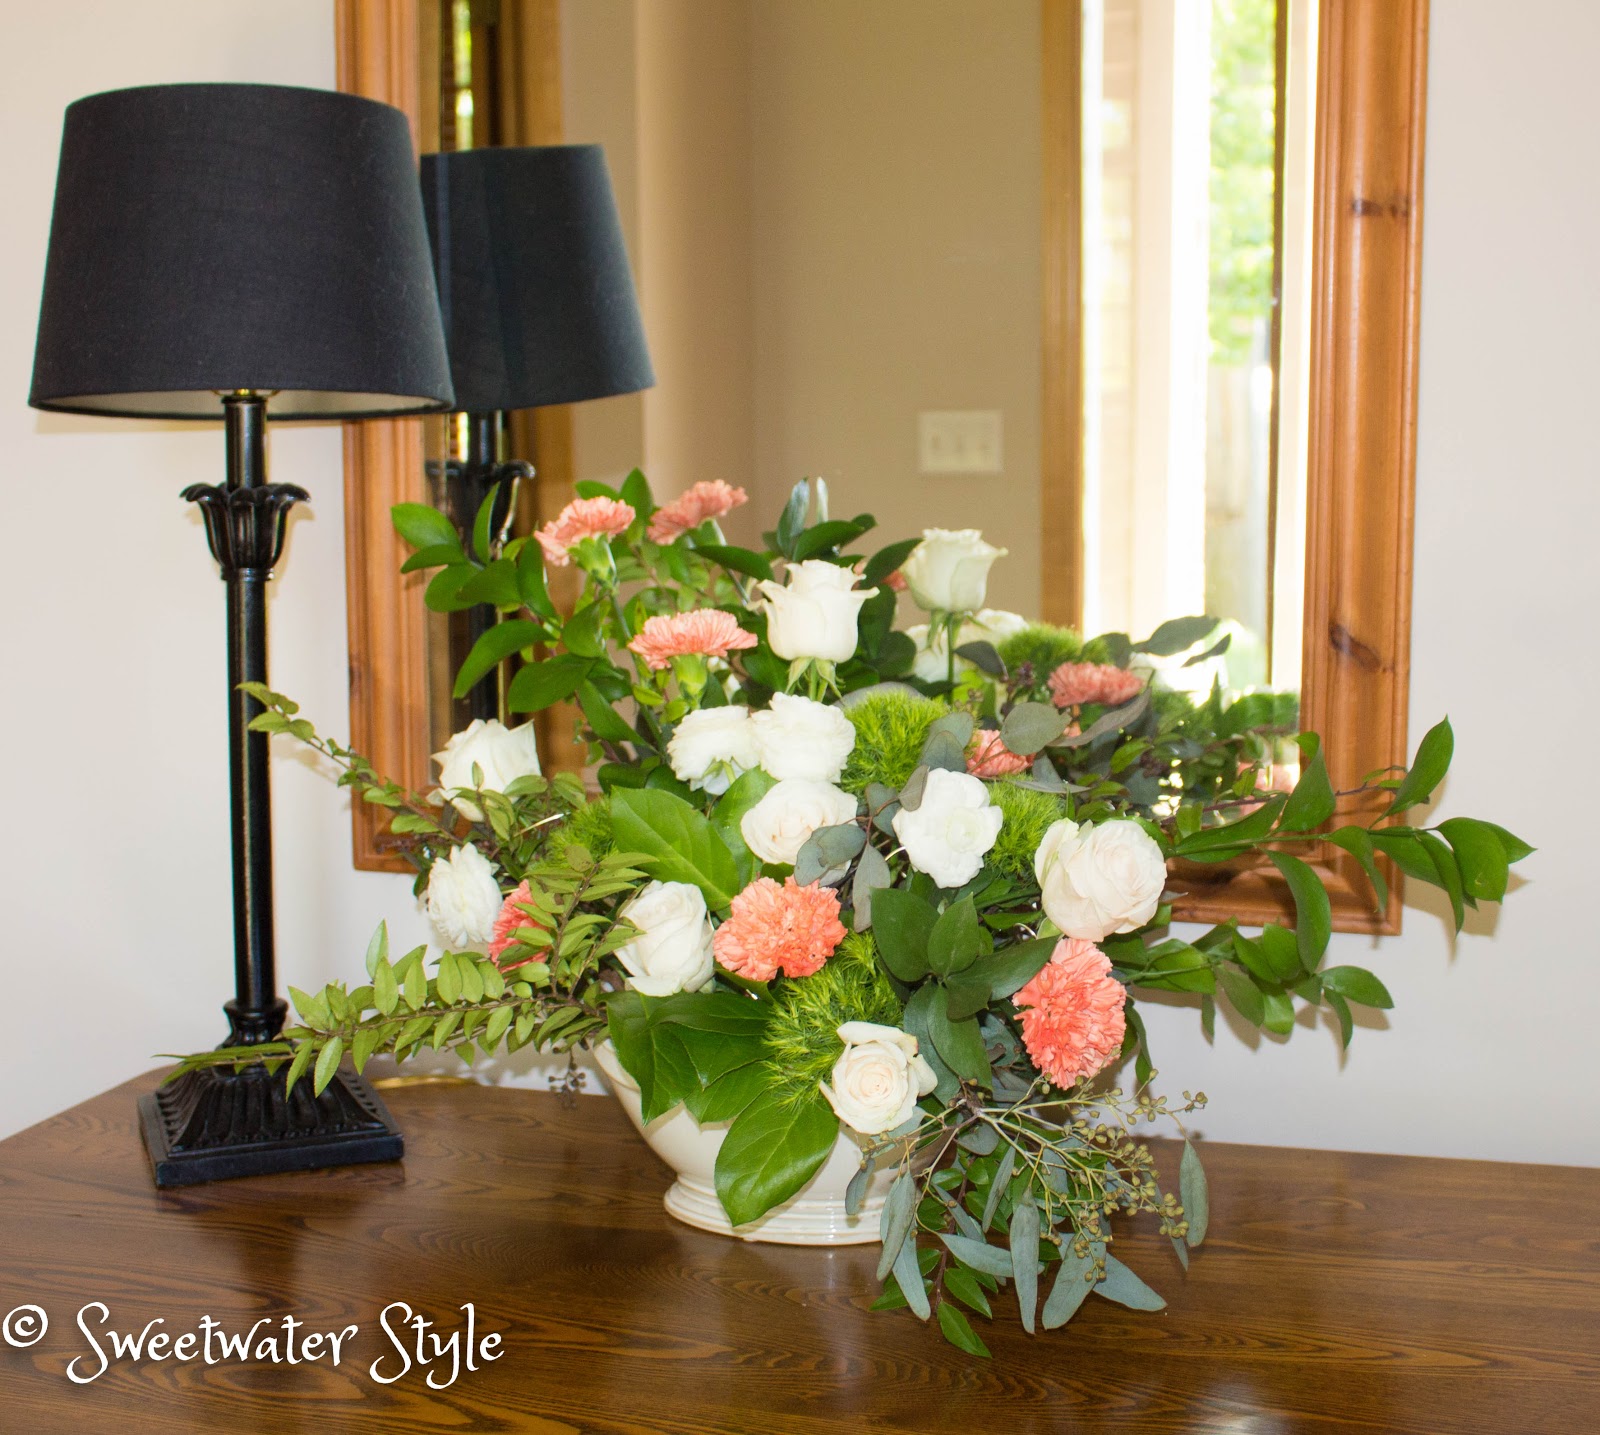
 This is the finished project.  
The stems could have just gone into the foam at an angle, but I like the way the wire supports the heavier flower heads that are cascading.
You can just barely see the wire….but I like the little glints of glitz!

I did not do a step by step of each flower…you are probably able to figure that out for yourself.

Here is a video to watch if you need “expert” advice

This is a nice text and photo tutorial from Janecanblog.com 


I hope you look at these beautiful examples of asymmetrical designs and the find inspiration to try something a little “messy” the next time you have flowers to arrange.

https://www.jennikayne.com/ripandtan/a-romantic-early-summer-arrangement-by-tinge-floral
My style still tends to be a little structured…..but I am trying to “loosen up”.
And hey….the wire can be used again next time.

Have A Great Day! 


Why You Need to Know How to install a Zipper!

The Kate Spade design aesthetic is one that I have always loved.
My heart broke when this icon lost her battle with depression.  What a tragedy.

The other day I was at HomeGoods.

I was thrilled to find this pack of 4 wonderful brightly patterned cloth napkins with her label.

Here is something Kate Spade that I can afford!!!

I knew that this cheerful pattern called “Flower Box” would make great summer pillows for the living room.

Since these pillows will be seasonal, I decided to make removable covers for existing pillows.

It is also nice that they are removable because the pattern has a bright white background that could get dirty.

I am not going to bore you with instructions on how to make a pillow cover.
You can figure out that you put the right sides of the two squares together and sew around the edge.
You need to leave an opening along one side to turn the pillow cover right side out!

THAT is where knowing how to install a zipper comes in.
A zipper closure is the absolute neatest way to close the edge of a pillow.

Yeah….I know all the excuses you are coming up with to avoid this!

  • “it’s easier to just hand stitch the edge…”
    • well…. actually…a neat hand stitch closer is pretty hard to get “right”.
  • “zippers are expensive…..”
    • well….actually….you can buy a whole bunch of zippers for less than a bottle of inexpensive wine.

  • “I never remember how to install a zipper…it looks complicated…
    • sew4home has put together the ultimate tutorial for installing a zipper
    • plus you will learn some crazy things about the history of zippers.
    • for instance: “Interestingly, Elias Howe, the same man credited with inventing the sewing machine, received a patent in 1851 for the first zipper, which he called: “Automatic, Continuous Clothing Closure.”  Can you imagine trying to tell someone to “check your automatic continous clothing closure!!!???

Hey…wait a minute….there were only 4 napkins in the package.
How did I make Three pillows?

One pillow is made with two napkins back to back.

I “cheated” on the other two and used some nice white duck fabric for the backs.
(this is a great trick if you are making pillows with super expensive fabric)

I hope this inspired you to learn how to install a zipper.
If you already know how….I hope you are inspired to go make a pillow!

https://www.123freevectors.com/free-fashion-design-brushes-zippers-stitching/

Have A Great Day!

Dropped Ceiling Panel Update

The latest project here at Sweetwater is a cosmetic update of the lower level bathroom.

This turned out to be one of those projects that reminds me of the book If You Give A Mouse a Cookie. 
If you aren’t familiar with the storyline….it goes something like this…
“If you give a mouse a cookie, he’s going to ask for a glass of milk.
When you give him the milk, he’ll probably ask you for a straw. When he’s finished, he’ll ask you for a napkin.
Then he’ll want to look in a mirror to make sure he doesn’t have a milk mustache. When he looks in the mirror, he might notice his hair needs a trim. So he’ll probably ask for a pair of nail scissors….”  and so on and so on.

The Sweetwater version goes something like this!

If you notice that some of the grout in the bathtub tile is cracked and dirty, you are probably going to need a trip to the store to buy a Dremel tool.

When you are at store, you will see a nice Medicine cabinet that would be a fix for the one that has a tiny chip in the mirror.

When you buy the new cabinet, you realize that the old cabinet had a light as part of it….and the new one doesn’t…

So you will just have to buy a new light.

When you take off the old medicine cabinet, you realize that the wall will need to have repairs and paint for the new light and cabinet.

Since the walls are painted a really dark red, you will need to use a primer and several coats of new gray paint to cover.

Since the bathroom is small and hard to work in with the fixtures in place, you will want to remove them.

When you take the toilet out, you find out that the flange is cracked, so you will want to call a plumber to replace this.

When you get the pretty new paint on the walls, you will notice that the white woodwork looks very yellow, so you will need to give it a refreshing coat of white.

FINALLY….we are getting to the real point of this post….The dropped ceiling panels.

This bathroom is in the basement and there is a need to have access to the stuff up there!  Don’t you love my technical language?  We access the plumbing for the outside deck faucet from here.  And dang it….a couple of times there has been leakage and staining.  The original acoustic tiles are no longer available….so it was time for something newer and better.

I was absolutely amazed at the variety of options available to update a dropped ceiling.
We decided on 2 x 2 foot paneled tiles.
If you have an unsightly dropped ceiling you might want to consider one of these!
I would like to tell you that this was easy peasy….BUT NOT!
It actually took Mr. S  three days and multiple trips to the store to get it finished.
AND…it involved lots of MATH and cutting and swearing under his breath.
But the results are amazing!

We are waiting for delivery on the special order medicine chest and a visit from the plumber to repair and install the toilet.  I also need to repaint the door a bright white. But all in all….this project is a wrap.

So…..if you give Mr. S a bathroom redo project, he is probably going to need a beer.
If Mr. S has a beer, he is probably going to want to go fishing!  And he earned it!

Now for me…..
If you give a girl a new ceiling in the bathroom, she is probably going to want one in the craft room!

Oh…and the original problem with the missing grout?
Solved!

Have A Wonderful Day!

Link Parties
The Cottage Market Cup of Joe

Painting the INSIDE of the Kitchen Cupboards!

Cleaning and organizing the kitchen cupboards is a great project at this time of year.  I started to do just that at the beginning of the month.

In the process….I looked…really looked at interiors of the cupboards!
YIKES!

The melamine laminate has the scratches and scuffs that come from normal use over time. The original white has become dull and yellowed.
I decided that they need a fresh coat of paint.
I did the research to find the best way to paint the interior of laminate cupboards and shared the plan with Mr. S.
Of course….he thought I was bonkers! 
“Nobody ever looks at the insides of cupboards?” he said.
“I do!” I said.  
“Whatever….do what you want!” he said.

So perhaps it is that I have too much time on my hands…..I decided to ignore all the naysayers and get on with it!

SO….ON TO THE PROCESS!
Supplies and Tools

I researched the kinds of paint to use and learned that it was critical to use really GOOD paint.  Really good paint is really expensive! The work this would take meant that the money for $50 a gallon paint would be worth it!

We chose this water based heavy duty paint from Hirshfields.

I love that it has a semi-gloss finish and that it cleans up easily with water.

A good quality paint brush, foam roller, and masking tape were the only other tools needed.

 I knew this project would be a lot of work and would take a lot of time….but hey I have TIME!
What I hate about projects like this is the disruption and mess!
There is no way that I wanted to totally empty the cupboards and do them all at once.
So I decided to take this on one cupboard at a time!

The first step was to empty the cupboard….duh!
I took the time to really look at all of the stuff as I unloaded the shelves.  I used this as an opportunity to do a little purging and re-thinking of what things we really needed to keep.

Next the interior surfaces get a good cleaning with some TSP.

Oh my!  What a lot of dirt and crumbs had accumulated!

 There really isn’t a lot of need to do much masking…and a little bit of newspaper was enough to keep the area around the single cabinet free from drips.

I used the paint brush to get into the corners and the foam brush was great for a nice smooth coat of paint.

I did one coat for all of the surfaces and then two coats for the shelves and bottom of the cabinets.

This paint dries very quickly.  The second coat could be applied after a two hour wait.

It seemed wise to let the paint cure for 24 hours to be certain it was hardened well.
Wow!  What a difference!

The bright shiny white cupboards make the cabinets feel brand new!
The time spent cleaning and sorting all the contents was also time well spent.

Before all of my vintage pyrex bowls were stacked in the cabinet in the lower photo.  This meant that when I wanted to use them….I had to do some major lifting to get the one I wanted.  I moved the bowls to the lower shelf on the smaller cabinet.  Then all of the pyrex bakeware went to the wider cabinet.  This is much more efficient and looks nicer too!

Right now, I am getting ready to paint the interior of that awful corner cabinet.  It is the one we keep pans and baking sheets in…..so as you can see there are a lot of scuff marks to cover!

It is probably good there is no “kitchen-cam” here!  Picture this lady crawling into this cabinet to paint!  I hope I don’t throw my back out!

Yup….I may be crazy!
But…I have controlled the crazy by doing this over a period of time.
The supplies can be stacked on a shelf ready for the days when “I have too much time on my hands” and need a project!

I guess this graphic says it all!

 I would love to hear about your crazy OCD/ADD projects!

Have A Great Day!

Link Parties
Eclectic Red Barn
Bouquet of Talent Party
Lamberts Lately   

Tips to save money on Professional Landscaping!

We built this house over 20 years ago.
We also landscaped around this house 20 years ago.

The gardens have changed through the years….

but the basic river rock around the foundation of the house has stayed the same.

These photos are about 15 years old.
The river rock is still pretty “clean”.

Over the years, the rocks have “collected” lots of composted matter that is just perfect for “growing stuff”….and not necessarily “Stuff” that we want.

My adage of letting things “bloom where they are planted” had gotten out of hand

It was TIME to do something!
The more Mr. S and I talked…..the less appealing it was to think about dealing with the rocks ourselves.

We decided to (GASP) hire professional landscapers!
We knew that this would be a project that would cost some considerable dollars!
We were okay with that…..but we still wanted to stay within a budget.
Let me share some things that we did to save money and get more value from the time the PROS were working.
DO take the time to have a lengthy consultation with your landscaper.  We walked the whole yard and talked about the areas most in need of work.  “Tim the Landscaper” had some great ideas for saving money.   

DO be very up front about your willingness to do some of the prep work ourselves.

DO be willing to utilize and move existing plants in the yard.

DO carefully review of the quote.  “Tim the Landscaper” included all of our dreams in a comprehensive list with prices.  This let us pick and choose what we wanted to tackle ourselves, what we wanted to pay for now, and what we would put off until next year.
I really think the time we took to really talk and communicate our wishes saved us money in the long run.  We also knew that the landscapers knew exactly what we wanted and were willing to pay for.
I am sorry to say that I DID NOT take photos of the week long process…..
but here are the results with how we incorporated the EXPERT PROS and our own “Sweat Equity”.
 

This is a photo of the front a few years ago.


“We” (meaning Mr. S!)  Hooked the truck to the old overgrown Barberry bushes and pulled them out.

There were also some shrubs in the rocks behind the Peony bed on the side of the yard.  I was embarrassed by how “ratty” they looked….and now they are GONE!

We also tried to transplant my beautiful Dahlias from this area….ALAS…..not so successful.  I guess I shouldn’t complain when I see this lovely clean slate.

We aren’t sure what planting we want for under the window.  So for now, we just moved these tall planters and the rose bush in for temporary fill.

There was a “mess” of overgrown Hosta, Pachysandra and volunteer violets in this part of the front path.

All of this got pulled out by us ahead of time.

After the rocks were moved and the mulch put down we planted a much edited version of the garden.

DO let the pros do the hard stuff!  It was a sunny 90 degree day when the three strong young men did the backbreaking job of removing all of the rocks. Can you just imagine how long this would have taken US to do!
DO think of ways to save work for the landscapers.  We had them dump the old rocks in our woods on the side to save the cost of hauling them off-site.

The round garden pavers had “sunk” through the years.  These were raised up for a nice sharp look.

The slate walk way is a real “gift” for me!  I don’t have to tip toe over rocks to get to the hose and water anymore.  I often garden in my barefeet…..so this might be one of my favorite upgrades!

With the shabby shrubbery ( don’t you love that alliteration?) removed, the landscapers brought in larger river rock to go down the side of the house.

This was a suggestion from Tim the Landscaper.  If we had used mulch here, it would have washed down the slope.  The bigger rock was just dumped over the old stuff which also saved money.

Now for the back yard garden!
Yikes….this area was getting completely “out of control”!
I had been meaning to redo this for a couple of years and now was the time!

Once again….we did the prep work of digging up all of the plants we wanted to save to put back or move to other gardens.

It was pretty messy under the deck for a few weeks.

Doing this ourselves was another money saver.
DO let the pros use their tools.
DO use “what you have”!
You probably don’t notice all the big rocks in the “before” garden.  Over the years they got lost under all the plants.  Using muscle and skill, they moved these rocks out to use in another place.  BIG money saver that would have been virtually impossible to DIY!
Once the rocks and plants were gone, the landscapers came in with round up to kill the weeds.
Then they added 5 inches black dirt and rototilled the whole thing!
You know you are a gardener when a big expanse of new black dirt is more exciting than new clothes!

We DIYed the replanting of some of the things we took out.  Most of this garden will wait for next Spring to become a fresh new cutting garden.  YIPPEE!

I walked through all the existing gardens to point out the many big rocks/boulders that were hiding among the plants.

These found “treasures” became new defining borders between the river rock and newly mulched areas.

The rocks will slow down water run off when it rains.

That way the mulch won’t wash down the slope.

Using existing boulders saved us lots of money.

We also used the existing square concrete pavers for the walkway.

The landscapers used their muscle and expertise to lift and place them in a new path to the compost bin.

This just might be my favorite part of the whole project!

Now I can safely carry the big loads of composting material down a clean path instead of sliding down slippery river rock!

The placement of mulch throughout this area is a nice clean look for all the Hosta we have waiting to replant.


 DO  listen to the expert when they have a good idea!

Tim the Landscaper drew up this plan for the side of our yard in the front.

This area is challenged by the intrusive roots from all the trees between our lot and the next door neighbors.

The grass never grew….
Plants never thrived!

The suggestion was to minimize the amount of grass…..dig out and replace several inches of dirt with new black dirt and sod!

We thought that a narrow strip of lawn might look odd….but Tim was so right!

The front edge of this garden now has a planting of native prairie grasses that will thrive in the poor soil…..and…hide some of the messy planting until we can get in and re do it!

The edge of the driveway got three rows of pavers to make that end of the driveway easier for backing out!  Mr. S. is really happy about this element.  I think it just looks so nice and finished!

DO be patient.  If you are going to do some of the work yourselves, you will not see a perfect landscape when the trucks pull away!  It is going to take the rest of the season to pick away at “perfection”!

Doing our landscaping this way saved us a LOT of money!
Doing our landscaping this way saved us even more frustration because we weren’t trying to do the “heavy lifting” ourselves!

I can’t say too much about how wonderful the landscapers were.  They came on time….worked super hard when they were here….and did a super job!

Now….with the money we saved….maybe I should head to the nursery to buy some new plants! 

Have A Wonderful Day

Link Parties
HandyMan Crafty Woman  

Bajan Texan