DIY

Throw Pillows from a Throw Blanket!

One of the easiest and thriftiest ways to update the look of a room is with decorative pillows.
Every one has them. In fact, I dare you to take a count of the throw pillows in your house!!!
I don’t just have pillows on the furniture….I have pillows in the closets waiting to take their turn in whatever decor scheme suits my fancy.

 A trip down the pillow aisle of almost any home decor store is pure temptation for me.

A pillow is affordable…..
A pillow is not a forever commitment like a piece of furniture…..

However…..
There is always the dilemma of how many pillows I should have out at one time.

If this is your dilemma too….I did a little internet searching and found these articles to be really helpful.

How Many Throw Pillows Is Too Many?

Guide to Choosing Throw Pillows 

Now…on to the latest pillow project at Sweetwater.

The rustic, Nordic theme in the living room needed to change once the holidays were over.

Somehow….I never got a picture of the living room decorated for the holidays….go figure.

This is the best shot I could find….but note the red plaid pillow and the Swedish hanging over the couch.

Anyway….the lumbar pillows on the two accent chairs needed to lose the red and beige linen stripe.

When I went to put the old turquoise covers back on the pillows….I realized that they looked pretty shabby!

Goody…a chance to go to the pillow aisle at HomeGoods!

source

There were literally hundreds of pillows to choose from….
There were literally hundreds of pillows that I DID NOT LIKE!

AND THEN……

 I spied this lovely nubby blue and white checked throw.

The price was right at 16.99

The fringe along both sides looked like those fancy fringed pillows that I like so much.

HMMMMMM!!!   This throw could easily become the new pillow covers!

The process was pretty darn simple.

I put the insert on top of the throw to determine the width of the pillow.

It turned out that the throw was exactly twice the width….so by cutting it in half lengthwise I could make both pillows.

I wrapped the throw around with an overlap and cut that to length.
I was able to have the fringe be the bottom of the wrap.
Then I turned it wrong side out and stitched the sides.

Normally with an envelope pillow the lap is on the back.
Because I wanted the fringe to be an accent, the overlap is on the front.

Here is a tutorial for making an envelope pillow.  Home Stories A to Z Pillow Tutorial
This is a technique that is worth learning!!!!

And now for the reveal!!!

Wow….2 pillow covers for $16.99 and I still have enough of the throw left to make something else.
Any suggestions???

Have A Great Day!

We’ve Moved…..The Fairy House That Is!

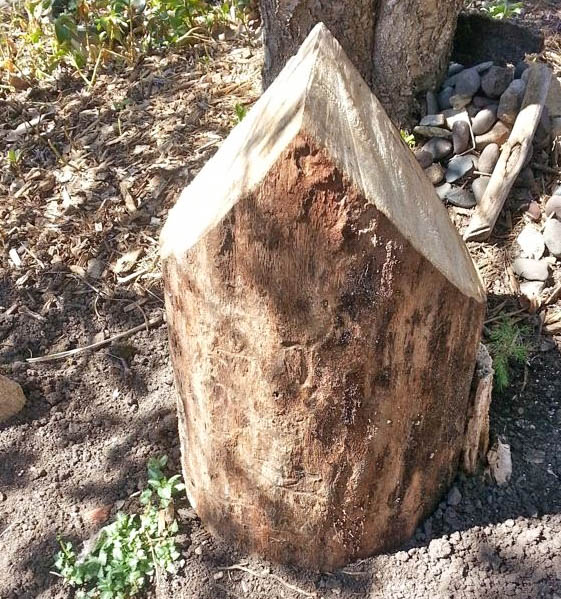
The Fairy House or Gnome Home here at Sweetwater has good bones!

READ HERE about how to turn an old stump into a pretty fabulous Fairy Garden structure

That was a couple of years ago….

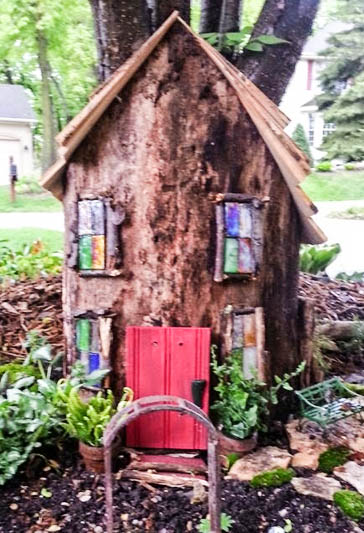
Just like any home, the Gnome home needs regular maintenance.

Well, this year instead of the usual spruce up of the property….I decided that it was time for the Gnomes to make a MOVE!

You know the saying….in real estate it is all about    LOCATION!
 LOCATION!
 LOCATION!
Instead of the busy intersection of driveway and front walk….the Gnomes deserve the woodlands and a pond view.
Luckily….the perfect “lot” was available!
Packing up to move is never any fun….but in this case it involved not just the furniture….but all of the landscaping materials….
AND
The WHOLE house too!


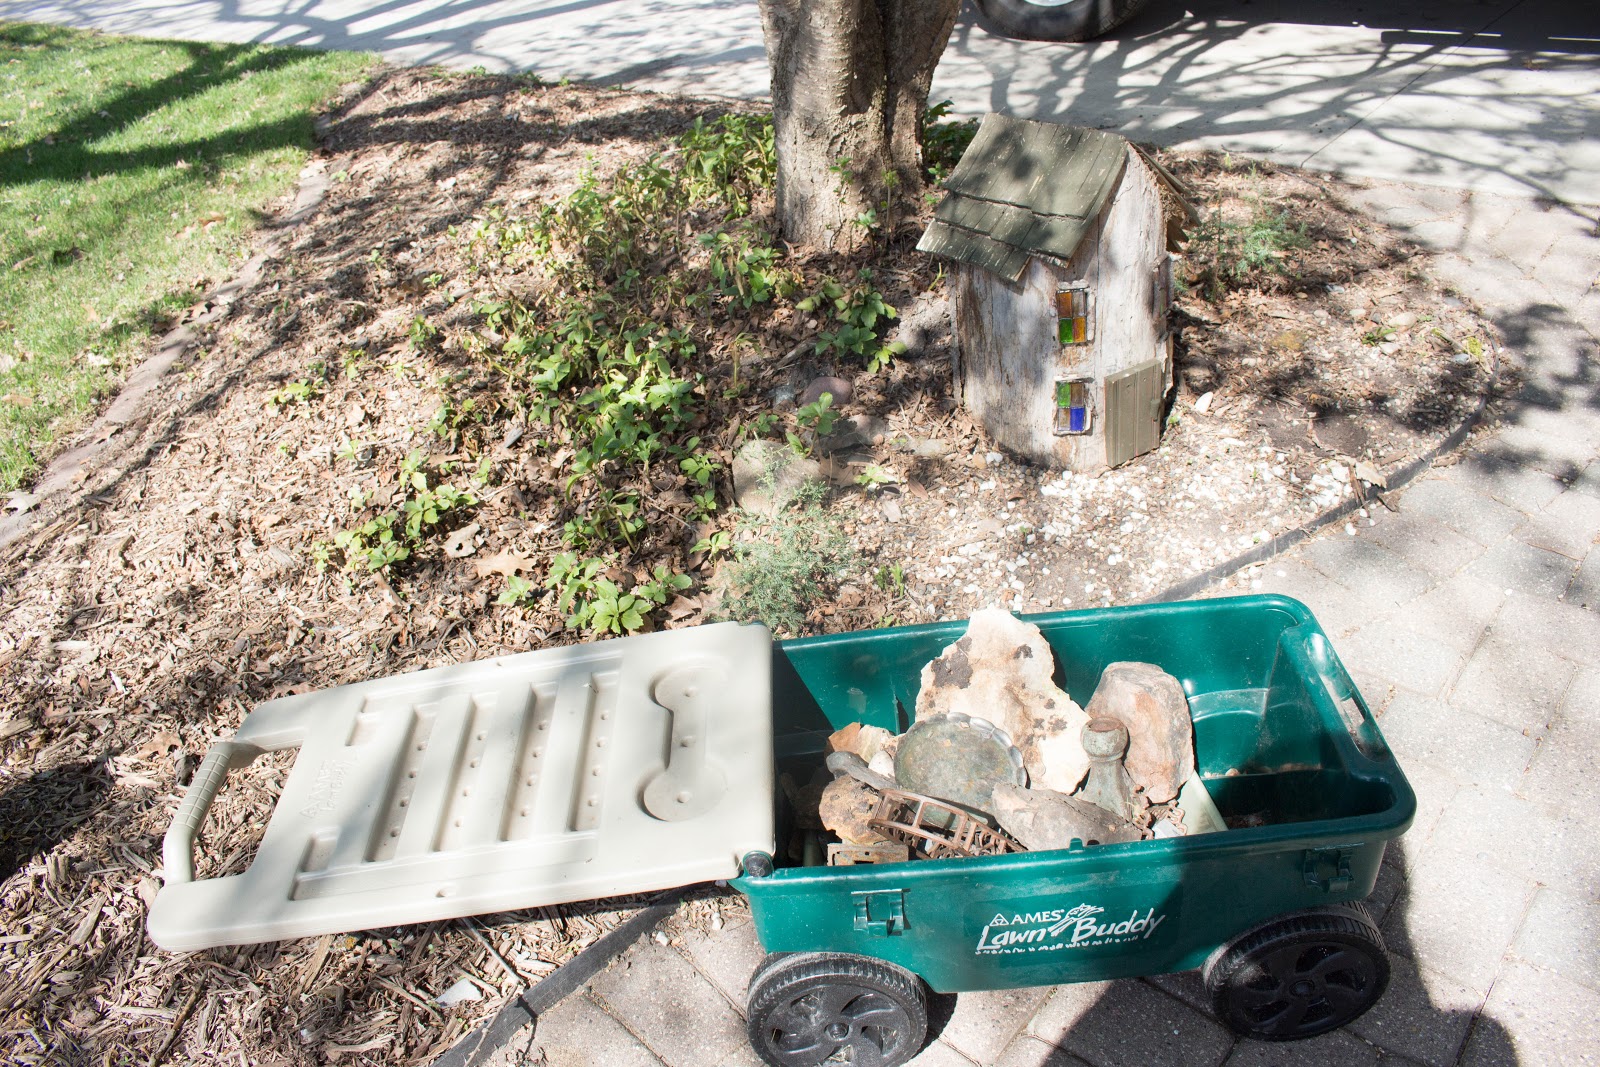
 It is a good thing the move didn’t involve too much distance….

The Sweetwater Grandboy was there to help with sprucing up the place with a newly painted roof.

The landlord wasn’t so sure about the bright blue for the roof….but hey it suits a Gnome….

The process would have gone quicker….
BUT….

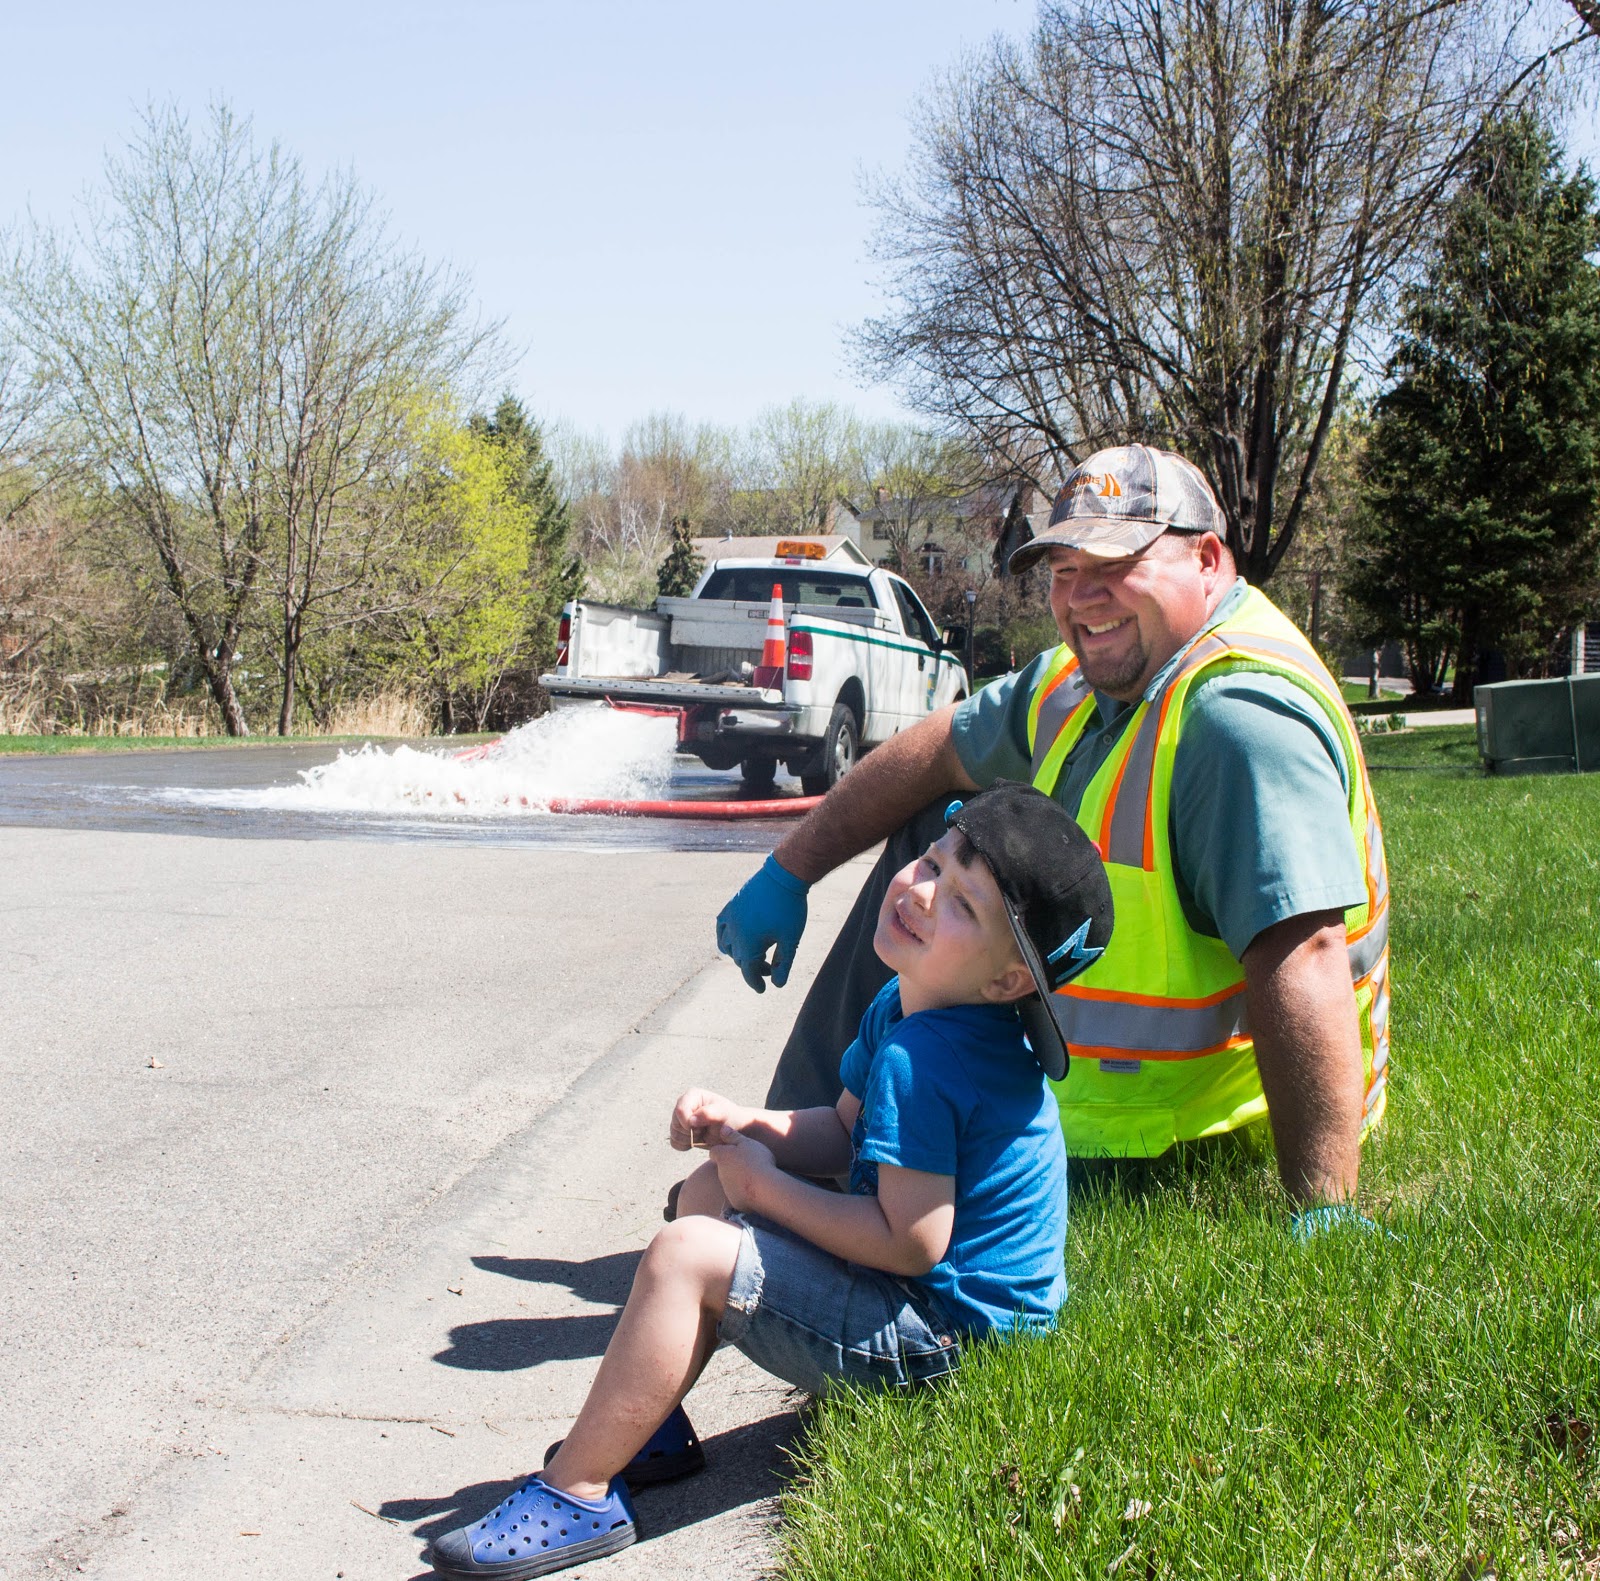
The city utility workers showed up to flush out the water mains….and that diversion was way too interesting to miss!

So….after a short break…

The renovation continued!

As moves go, this one was pretty painless…I guess that is the magic of Fairies and Gnomes!

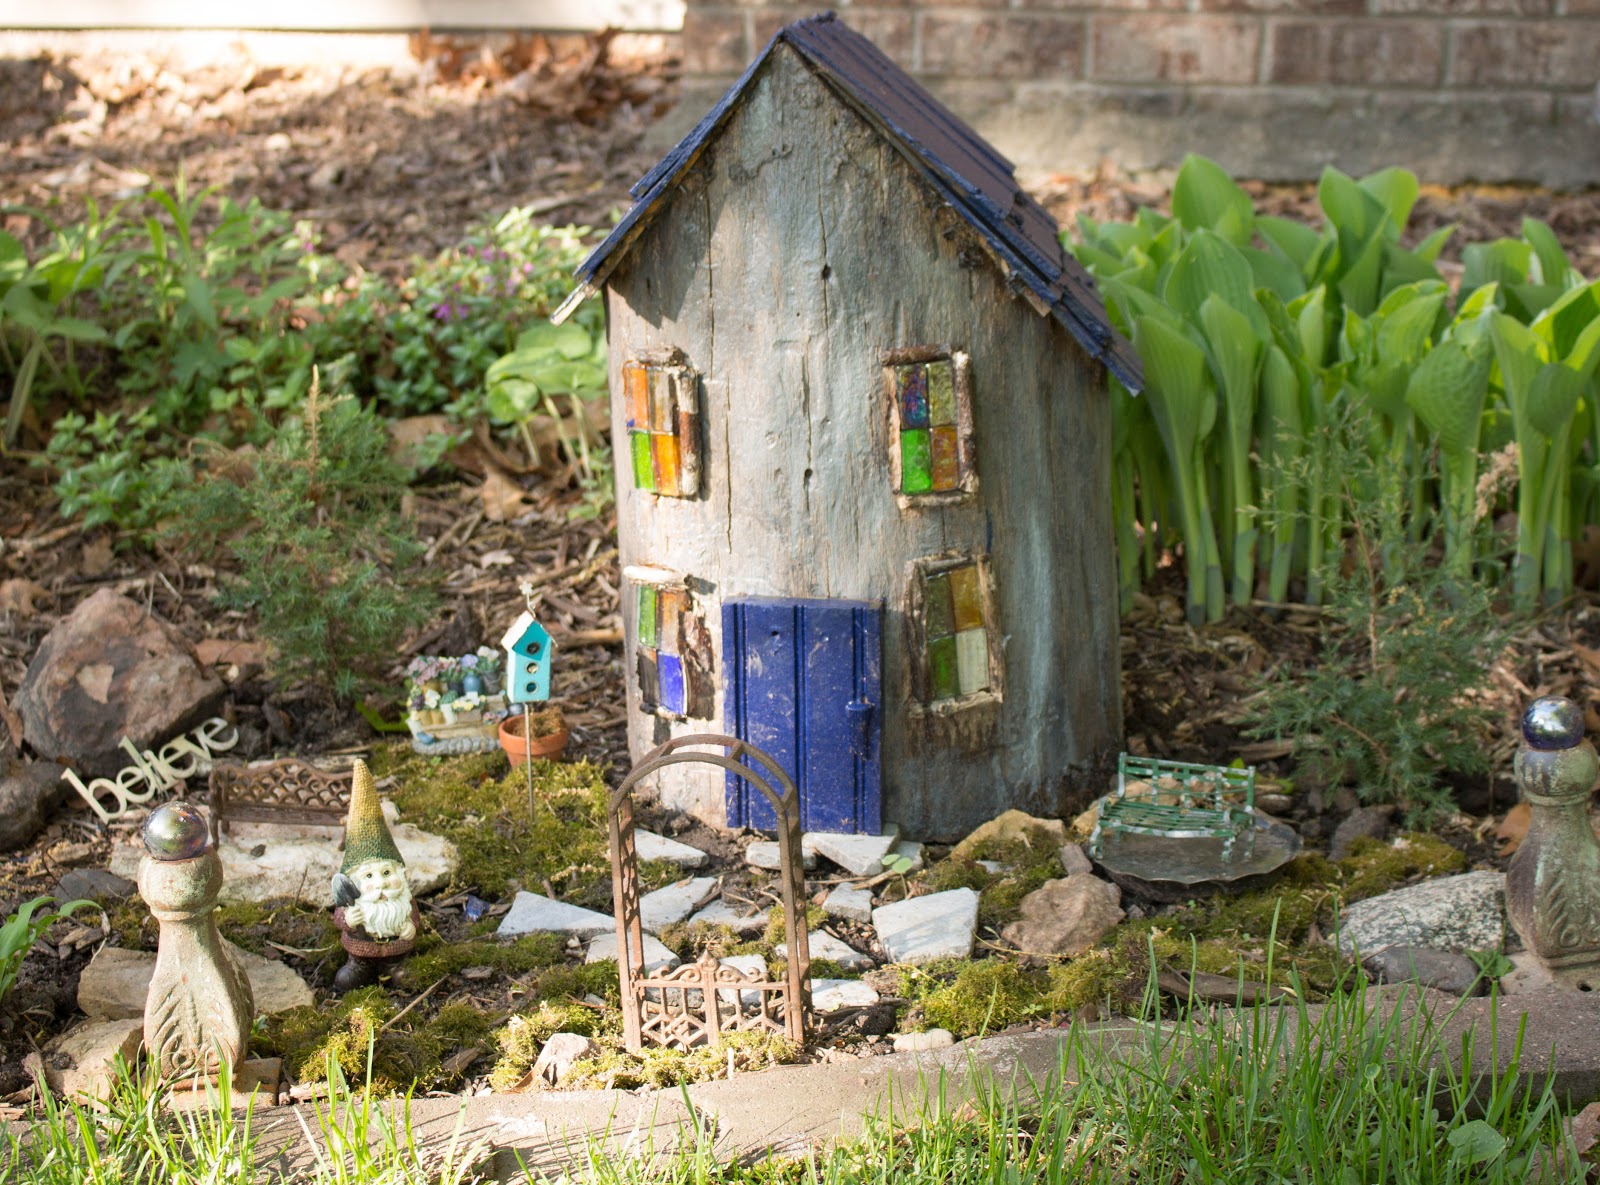
 I hope the Gnomes like the upgraded pond view!

Remember…..There’s No Place Like Gnome!!!

Have a Great Day!

In Praise of Expertise Part 2…Almost Done!

The bathroom reno is nearly finished.
All that is left to do is choose window treatments and accessories.
When I walk in…..I just look around and smile!
While My last post was all about using experts to help choose the components for our bathroom remodel…..
This one will be in praise of the people who actually made it happen.

 I almost feel guilty sharing all about the new space since we really didn’t DO anything ourselves. 

It kinda feels like I am doing one of those….”look at me” deals.

So this post will NOT JUST be about how gorgeous the new space is.
It will be about….why it made sense to (gasp) spend money to get this done!

  1. Remember that Mr. S just had his ankle replaced less than 6 months ago?  Can you even imagine him trying to go up and down the steps as many times as would have been necessary.
  2. Our contractor did an amazing job of scheduling.  Because all of the people that he worked with had a relationship with him, they came when he asked and made adjustments when necessary. THAT SAVED TIME!
  3. We were able to use the discounts available to the contractor for many of the components of the project. THAT SAVED $$$$ !
  4. There were many things that needed specialized skills that we would probably have had to hire done anyway!
ANYWAY…..during the month long process….I don’t think a day went by that we didn’t say “THANK GOODNESS we are NOT doing this ourselves.  
So in good old renovation show terminology……it’s time for the big reveal!

Ahhh….the freestanding soaking tub that I have been dreaming about since we started is every bit as beautiful as I imagined! Taking out the old surround for the whirlpool tub that I never used freed up an enormous amount of room for the shower.  There used to be a soffitt over the shower.  Removing that makes the shower seem even bigger.  The custom glass is seamless.  The “experts” were able to install this in less than 2 hours.  

We found these tilting mirrors on Amazon of all places.  They look just like the ones in the lighting store where we found these great fixtures.  When the contractor actually “complained” about how difficult the installation of the mirrors was….I knew that a DIY session would have been extremely painful for Mr. S.!

I love the squared off under mount sinks.  The glossy white counter is a dream compared to the old molded “marble” that it replaces.  This really big vanity was another reason we were glad we had experts to rely on…..it is 78 inches long and came in one big piece.  Imagine us trying to haul that fro,

We still need to find window treatments and some towel bars and other stuff…and I imagine there will be some DIY with those things….
Less than a month total time….
Little or no hassles….. 
It really was worth the expense to save time, headaches, trips to Home Depot, arguments etc. etc. etc.
But the REAL proof of value….
The Sweetwater Grandboy gives his seal of approval!
Have A Wonderful Day!

Gift Idea: Tea Towel in a Frame

Two weeks until Christmas!
That means that there isn’t a lot of time around here for writing blog posts.
My goal is to do a few posts with a ideas that you might use to save time and/or money during the holidays this year.
Frame A Tea Towel for Statement Wall Art

Inevitably, you are going to be going shopping in one of those cute gift boutiques….
Inevitably, you are going to fall in love with lots of items that are way out of your price range….
Don’t despair!
Check out the tea towel section….you will probably find something very cute for a reasonable price.
AND…
Tea Towels make fabulous gifts….
BUT…
Why not take it up a notch and frame that tea towel to create a statement piece of wall art?

I found this towel at a gift boutique….yeah…I know I said this was about giving gifts…but I loved it so much I had to keep it for myself. (note to self: next time buy TWO of something thrifty that you love).
I already had the frame, but you can find deals on poster frames with the mat already in them.  Michaels and IKEA are good sources.

The HOW TO is simple:
1. Buy the tea towel.
2. Buy the frame.
3. Iron the towel.
4. Use spray adhesive to smooth the towel on the backing cardboard that comes with the frame.
5. Reassemble the frame.
6. Wrap it up!

Be sure to tell the person you are gifting how easy it is to change out the “art” for each season!

I have written about this before with more detailed instructions and some good sources for tea towels.

Tea Towel Wall Art: http://sweetwaterstyle.blogspot.com/2017/04/tea-towel-wall-art.html

Sources for Tea Towels http://sweetwaterstyle.blogspot.com/2015/01/wall-art-from-tea-towel-and-interesting.html

Remember when every 1960’s kitchen had a calendar tea towel? (well….some of you are too young to remember that….but trust me)
A framed calendar tea towel is an easy way to go beyond the ordinary…and way cuter than the one on your phone!

How cute are these towels from Spoonflower.com?

Hope this has given you an idea for a last minute gift if you needed one!

Have A Great Day!

How to Make An Outdoor Light Swag

The front of the house here at Sweetwater has five light fixtures.
Two on the sides of the door and three across the front of the garage.
So nice to have all of that light.
Not so nice if I want to decorate those lights for the holidays.
Buying swags for FIVE lights is really not an option for someone as CHEAP thrifty as I am!
So over the years, I have learned to make my own using stuff that is almost free.
Read on to learn the trick behind this pretty swag.
 
Did you notice how this swag has a lot of dimension from front to back? 
I used to just gather up some greens….wire them together in the middle and tie it with a bow.
They looked okay but were sort of flat!
AND THEN….
I discovered a trick for making these fuller versions.
 
Chicken Wire! 
An eight inch strip of chicken wire can be cut using a sturdy snipper.  I am so lucky that Mr. S gifts me with these romantic type presents!  I guess he knows what I will actually use!
Form the eight inch strip into a cylinder by folding it over and pinching the sides in.  It is helpful to use work gloves when you do this…chicken wire is really hard on your hands.
Now you have a form/base for your scraps of greenery.  I love the fact that you can use some pretty shabby greens in the back of your swag.   Just keep snipping greens and pushing them into the wire.  After you have the top and bottom of the swag the shape you like, start adding greens that stick out and make the swag look full from the front to the back.  You don’t need to put a lot of greens in the center because your bow will go there.
 When you are pleased with the greenery, you add a bow.
Bows seem to be intimidating to people.  Making a fancy bow is really pretty easy.  Check out this link to see a step by step of the process.
 I used some of that fun netting as the background for the bow on these swags.  That stuff is easy to find…I have seen it at the dollar store, Lowes and Micheals.  I like how it makes the plaid ribbon stand out.
These swags on the wire cages are especially nice because of how they can be attached to the lights.  Simply run a length of ribbon through the back of the cage.  This ribbon can be tied around the light.  No worries about wires that can scratch your fixture.
 I am always pleased that the swags look like something that I went out and purchased!
They frame the entry and add a lot of holiday oomph for little or no money!
Happy Decorating….
Before I go…..The Sweetwater entry is decked out for the holidays too!  I had an old grapevine wreath that was the perfect size.  A few scrap greens and some leftover ornaments from the Festival of trees event…..I am liking this a lot!

Have A Great Day!