clothes

Goodwill Clothes Alteration Hacks

I haven’t posted about thrift store shopping in awhile.
Never fear….that does not mean I haven’t done any thrift store shopping!

This week I was perusing the selection of pants in my closet.  Yikes…it is filled almost entirely with black pants and jeans leggings with some fancier pairs for dressier events.
I pretty much live in Yoga pants until it is time to go out.  Then casual is the rule. Ahh…the life of a retiree!

I headed to the thrift store this week with the goal of finding some summer pants that were not jeans or black!  It is usually a mistake to go to the thrift store with a specific item in mind.  Mostly that will be disappointing.

But the Good Will gods must have been watching over me this time.
I found not one, but three pair of summer pants.
AND…..a super cute summer sundress.

But here is the deal!
They were the perfect PRICE….but not the perfect fit.

Instead of passing these bargains up….I knew with very little time and effort I could cure what ailed them.

 I am pretty short so almost any pair of pants is going to need hemming up!
The red pants were the right length but were not tapered enough…..
The white pair and khaki pair needed hemming…..
The sundress hit the floor and then some on little me….and I wanted tea length because I know I will get more wear out of it.

Knowing how to do some basic alterations and/or tailoring is one secret for success at the thrift store.

If you think you have no sewing skills…..remember….the items you are working with cost less than a glass of wine in a restaurant!  You can take a risk and see what happens.

Here are my favorite alteration hacks:

Hemming: 

  • Sometimes the easiest thing to do is just turn the existing hem under and do a few tacks with a needle;
  • Fusible hem tape is a great time saver if you don’t feel like sewing.
  • Tightly woven knits like athletic leggings with lots of spandex can just be cut off with no stitching.  You will be amazed at how well the raw edge stands up to washing.
  • Alas…sometimes you need to do an actual hem….but don’t stress with finishing with hemtape and all that.  Just cut them off….turn it up and stitch. 

 Straps:

  • So many cute tops and dresses have spaghetti straps.  When you try on an item….pull those straps up to see if the top looks better. It is an easy fix to tack the shortened strap to the inside of the back.  This trick fixes a couple of fit problems….saggy bodice, loose underarms, and in some cases, pulling the straps up makes the waistline fit better too.

 
Under the arm:

  • When you see a top that looks just a little too big, sometimes it is a matter of just taking in the side seam.  This works especially well with sleeveless tanks.  The added benefit here is that you can fit the underarm area and taper it to the bottom.  This gives a little more room for your bottom too!

Baggy Legs:

  • I like the look of fitted skinny legs on most casual pants.  These cute red pants are a great example.  By tapering the inside leg seam just 1/2 and inch, they went from way to “preppy” and hard to find shoes for….to perfect casual with sandals or flats.

Every one of these alterations can be done with a straight stitch with the sewing machine or a few simple hand stitches.
It is definitely worth remembering when you find something wonderful at the thrift store that has “possibilities”!

OR….you can call a friend who sews 🙂
OR…you can find a tailor shop.

AND….all of the above also works for any bargain shopping you do.  If you find a good deal….but the fit isn’t good….think of the possibilities for a quick alteration.

Wishing you a wonderful day!

Presto Chango Turtleneck to Jewel neckline Sweater!

Where do you stand on the “Great Turtleneck Debate”? 
Is this style a fashion classic or a fashion no no?
Yes, I know that this is probably not nearly as interesting as the current political debates going on…..
oh wait….
maybe it IS more interesting than the current political debates!
I kind of think that for me it is a matter of aging.  Over the years the turtlenecks that I used to love just don’t fit as comfortably as they used to.
It couldn’t possibly be that my neck isn’t quite as smooth and thin as it used to be????
I found this fashion advisory for “a woman of a certain age”…..

“You may think a ­turtleneck hides a sagging neck and chin, but it is more likely to draw attention to jowls.”

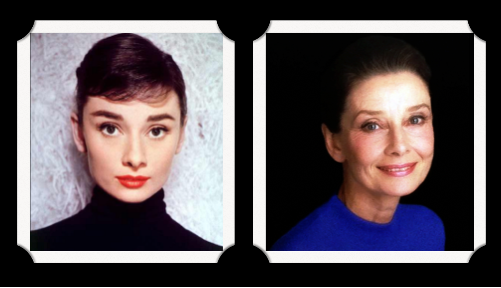
Audrey Hepburn knew this….there are lots and lots of photos of her in her youth with the classic black turtleneck.  In later photos you see more v-necks and jewel necklines. 

Now….I would never aspire to looking like Audrey Hepburn….no one  could!
But in the great turtleneck debate….I need to vote NAY!

I am a sucker for cashmere!  I find the most wonderful cashmere sweaters at the thrift store. They usually sell for less than $10.  Sadly…..many of the prettiest cashmere sweaters are turtlenecks!  I buy them anyway! Then I use some “magic” and turn them into jewel neck treasures!

Want to see how?
You really won’t believe how easy it is!

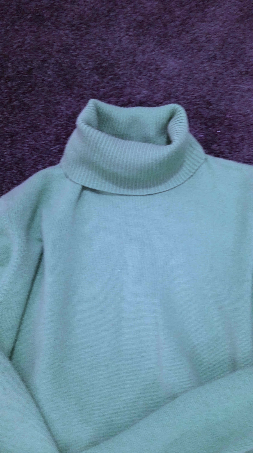
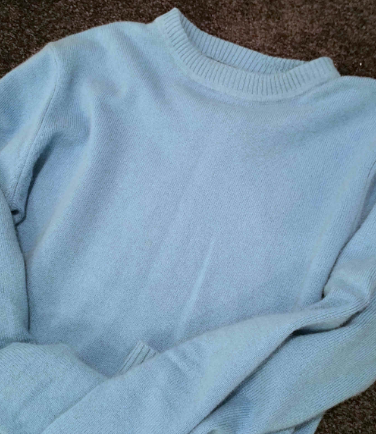
 This sweater is the prettiest blue (the photo really doesn’t show it well).

Notice the classic turtle neck!

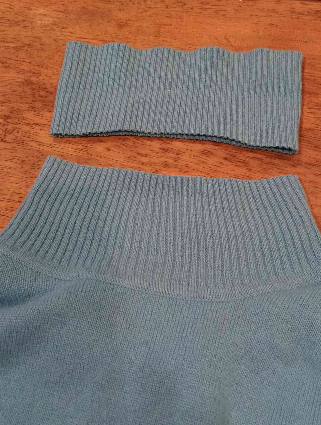
All you do is pull the collar up and cut about half of it off. 

Leave enough of the ribbed knit to fold to the inside.

Use the wool setting on your iron and steam press the ribbing so that it exactly joins to the line where the ribbing joins the sweater. 

Time with the iron is well spent in making the next step easier.

It is simple to just hand stitch the raw edge to the neckline.

Use the tiniest stitches you have patience to do…..
Try to catch as many of the raw knit loops from your scissors cut as you can.
This will keep it from unraveling.

I don’t get all hung up on using special knit thread…..this is a thrift store sweater after all!!

The finished jewel neck looks really nice….
It will feel so much better than the turtleneck….
It only took about 20 minutes to do this!
BTW….because my cashmere sweaters are almost all from thrift stores….I never dry clean them.  Use a gentle wash with Woolite and lay them flat to dry!  
 Where ever you stand on the turtleneck debate…..
Have A Wonderful Day!

Monday Musings

It is a dark and stormy morning here at Sweetwater!
A great morning for a cup of coffee and some MUSING!

One of my blog feeds is a lovely blog by Tish Jett called  A Femme d’Un Certain Age.

Her blog is a fascinating read all from the point of view of an American in Paris.   She is all about analyzing, dissecting and incorporating the “French Style” for us.

I highly recommend that you find your own beverage of choice and sit down to browse through some of Tish’s Musings.

I read one her blog posts about Uniform Dressing a few weeks ago and it really stayed with me.  Her take on wardrobe simplicity is truly spot on.

In the post she made a list.  I LOVE her list!  I certainly wouldn’t claim to be a fashionista, but I do like fashion and an ease in being somewhat fashionable.
So, I am sharing that list with some Sweetwater Style musings on her thoughts.  Enjoy!

“It takes no more time to be stylish than it does to be sloppy.”
 This is a no brainer!  When you go to your closet to pick what you are going to wear, it is just as easy to pick out things that you know go together and look nice on you.  Even your yoga pants and t-shirts can be chosen with style in mind. 
 No woman really wants to be invisible does she?
“Taking care of one’s clothes makes them last longer.”
It is rarely necessary to dry clean any clothes. Goodwill “finds” are often there because the label says “dry-clean only”!  Even cashmere and silk can be carefully laundered on the gentle cycle.  Quality clothing is made from fabrics that stand up over time.  Because of that I have good quality stuff purchased at thrift stores that still look great after 5-10 years of wear. 
“Frenchwomen make sure that everything in their closets is ready-to-wear.
If the clothes in your closet are clean, ironed with all buttons in place and hemmed to the right length, then anything you see can be put on.  Keep clothes that need tending to in another place and try to take care of those “fixes” soon.
“Taking care of one’s clothes means you’ll always have something to wear.”
All budgets can be accommodated.  
Well….this is truly the Sweetwater Style point of view!  So many of my favorite wardrobe items are from thrift stores.  Why in the world would I want to spend lots of money buying basic things for retail prices when they can be had for a fraction of the price. Style does NOT have to be expensive.  I hear people talking about how much time it takes to shop at the thrift store.  But for me…it seems more time consuming to go to the mall and shop all day for “just the right” outfit.  I always have a much harder time deciding what to buy if I am going to have to spend “big bucks”.  I also know that I am willing to take a risk and buy something a bit outrageous if I am paying thrift store prices.  These gems often become the things that I reach for over and over again because they are FUN!
It’s depressing to have an overflowing closet and nothing to wear.  
Tish is all about “Uniforms Dressing”.  She makes the case that if you take the time to analyze your own style and choose items that work together to become your “uniform” it is liberating and not boring.  Maybe it is black leggings and loose tops.  Maybe it is long loose skirts and t-shirts or jeans and crisp white shirts.  Whatever…it is just a matter of taking those basics and adding a few accessories.  And hey…shopping for accessories is lots of fun.
Your “uniform” means that you will always have something to put on! I have on my “to do list” to cull my closet of those things that I don’t wear because they no longer fit my life style.  Wish me luck with THAT!

 Making the effort to look stylish is psychologically healthy.

Right now I am sitting in my sleep pants and a plain sleeveless t-shirt.  Since they came from Good Will, they are nice enough…..but not terribly stylish!  Honestly, when I walk by the mirrors in the house, I am less than “happy” with the look.  It is time to take the 5 minutes it will take to go put on something else.  It will be an attitude changer that won’t take much effort. We all know the feeling of going out and about not looking our best.  It never fails….you will run into a friend….or worse an aquaintance….and wonder what they are thinking!  Not worth the stress! 

Looking good makes you feel better.

“Dressing down sends a message of “I don’t care about me” 
(or you either for that matter).”
When you choose to wear things that go beyond casual to sloppy you are actually telling the people you are with that you don’t value spending time with them enough to make an effort to be your best.  Of course, how you interact with people is always more important than how you look.  But if looking good makes you feel better, then you will be more comfortable with your interactions.  Nothing is more boring than a conversation that starts with an apology about how “terrible” you look.  Way better to say….”don’t we look fabulous!” and get on with having fun.

I am off now to get out of my current outfit and put on something presentable.
I hope you take some time to go read more inspriration from  
The rain has stopped and it is time to stop MUSING!
Have a Wonderful Day!


Goodwill Style!

A couple of months ago, I was happily shopping at Goodwill!
You are probably saying…”How is that news?”
Well…I ran into a friend who was doing a thrift store style consult with Lindsey who is
 the owner of Fashion Fix MN!
Lindsey does closet organization and Wardrobe Styling.
The most fascinating part of what she offers is….. thrift store styling!
I watched the consult for a little while and then asked if I could shadow her sometime and watch this interesting process.
I did just that this week.  I spent an interesting couple of hours with watching her “work her magic”!
Come along and see!
Don’t you just love the mission of Fashion Fix MN?
Her consultations are NOT just about scouring the racks for bargain clothing!  She is all about teaching her clients how to create a styled wardrobe (on a budget) by themselves after the session is over!
The process starts before the client arrives.
Lindsey whipped through all of the racks of clothing like the pro she is…
She had background information about her client so she can select sizes, colors and specific items that fit her needs.
She told me that she looks for quality of fabric and colors more than brands.
She also makes an attempt to move the client outside her “comfort zone”….but not too far!
I agree whole completely that Goodwill is a great place to “take a risk”.  You can do that with thrift store items…..especially if some of those items are at green tag $1.99 prices!
Lindsey has built a good relationship with the staffs at all the thrift stores she uses.  
This means that they support her use of the facilities…a real help to have a clothing rack and understanding that she will be “monopolizing” a fitting room for an hour!
I noticed that the other shoppers are super interested in what she is doing, hanging out and listening to what she has to say!  
 The real fun began when Karin arrived!
For this consult….the client was interested in tops only!
Karin tried on with the different tops and then Lindsey styled the outfit with accessories and other layers!

This great looking orange top still had the store tags on!

The scarf is a great color match….but Lindsey did not recommend it for purchase….just for effect!

She spent time talking about why the scarf wasn’t good….not enough fabric and quality…!

This knit blazer from the rack added a polished look to the top!

Karin’s works as a home stager.  She commented that this look would make her feel professional and yet comfortable when she is meeting with her clients.

While the fit on this yellow top didn’t work…it was the color that Lindsey wanted Karin to consider!

The 2 layerd loose long sleeved cardigan was a keeper!

Karin commented on it’ versatility and comfortable style!

Truthfully…I wanted to sneak it into my OWN cart!

The print top here is an example of thinking out of Karin’s comfort zone.

On the rack…the print has an “old lady” look!

Lindsey paired it with a knit blazer and noted that if you saw this at Anthropologie you would think it was the height of retro fashion!

For thrift store prices….worth the risk!

Color and fabric are the standout features of this pairing.

It is hard to see how really striking the color of this cardigan is.

The striped top is one of those “go to” items that Karin is sure to wear often.

Lindsey talked about different ways to pair each of these pieces.

So Karin isn’t just getting a top and sweater….she is learning wardrobe confidence.

This top was a perfect choice for so many reasons!

Fabric, color, shape all fit Karin’s style.

Notice the necklace!
I would never have picked this up from the rack….but it is just exactly what this top needed to go from great to amazing!

What a fun coincidence….Lisa, another of Lindsey’s clients was in the store doing her own “independent” thrifting and when she saw Karin she stopped to show us her “finds”!

Hmmmm….

It looks like Lisa “learned” the styling lessons from her session with Karin!

The outfit she was wearing certainly “follows the rules”!


Lisa went into the dressing room next to Karin and got some on the fly styling from Lindsey!

A few little adjustments to the tie belt turned this cape into a fashion statement piece!

After the client tried on all of the different outfits, Lindsey walks away to let her decide what she really wants to purchase.

Lindsey does not pressure the client to buy anything!
Her mission is to teach the concepts of the styling and let the client make informed decisions!


I learned a lot during my shadowing experience…..
I was also affirmed about my own “Goodwill” philosophy!
Try new things….
Take a risk…
Get a bargain!
If you do not live in this area, there may be other stylists out there who do this type of thing.  If you know about anyone, add a comment.

If you do live in the Minneapolis Metro area…..take some time and visit the FashionFixMN to see if this is something you might be interested in doing!

Thank You Lindsey….it was great “Good Will Hunting” with You!
Have A Great Day!
Link Parties 

DYI No Crease Pants Hangers!

Some people just HATE ironing….but….don’t think I am crazy when I say….
I don’t mind ironing….in fact it can be kind of relaxing!
But what I do hate is when the pants that I have ironed get creases in them hanging in the closet!
The problem is the hangers…..

Even wooden pants hangers don’t seem to solve the problem for me.

The wood bar still leaves creases….and I don’t like to hang my pants from the cuffs!

I have looked all over for padded hangers for pants and have been unsuccessful!  And chances are…if I ever do find some….I will be too “cheap” to shell out the $$$ for them!

Read More to see what I did instead!

A couple years ago, I made these padded hangers…..

In effect, they are batting filled tubes wrapped around the hanger and hand stictched closed.

I tied some ribbon around the ends to stabilize them.

You can hop over to read the tutorial by CLICKING HERE.

I made about 10 of these  pants hangers….but since I do go to the thrift store a lot…..I have (gasp) more than 10 pairs of pants!!!!
It was time to make more padded hangers….and to be honest…..I am not all that much in love with these (another gasp)!

Then I thought about this stuff!
If you don’t recognize it….it is pipe insulation.
Home Depot sells it for a buck twenty five for six feet!

I have used this stuff to hide electrical cords…..a post for another day!

I even used it for the trunks of the Truffala Trees ala The Lorax (click to see how)

What a versatile product!  I probably should ask Mr. S if we actually use it to insulate the pipes!

Anyway….I had an AHA moment and figured that this stuff would be perfect for streamlining the padded hanger project!

I was right….It was super simple….It was fast…..It was CHEAP!

I used inexpensive plastic hangers. 
(already had ’em so no cost there)
I had some nice crisp lightweight cotton canvas, but you could use any smooth crisp fabric.
 (already had this so instead of cost it was a benefit  to empty the fabric stash)
I bought 18 feet of foam tubing…..total cost $3.84
I also used the glue gun!

The process is almost too simple!

Cut the tube the width of the bottom of the hanger (in my case 15 inches)

The foam already has a scored line to separate it (you know….to get it to go around the pipe)….so it is easy to cut the slit in the foam.

 Cut a piece of fabric 2 inches wider than the tube by 5 inches.

Then it is just a simple matter of tucking the fabric into one side of the tube…


Then smoothly roll the fabric around the tube and tuck it into the other side.

The extra fabric helps to fill the space around the plastic hanger bar.

Tuck the extra end fabric into the tube on both ends.

Then you slide the fabric covered tube on to the bottom of the hanger!

Seriously….could it be simpler?

I secured the plastic hanger to the tube by squirting a little glue from the glue gun into the space.

You would not have to do the gluing….but the tubing did shift a little.

I also added a squirt of glue to each end to secure that fabric.

 These four hangers took about 15 minutes to make….and I have supplies to make 6 more!

So in an hour I can have 10 pretty snazzy pants hangers for less than 5 dollars!

Since I used such a crisp canvas….I think they almost look “manly” enough to get some use on the other side of the closet!

Have any of you found “AHA” uses for pipe insulation?  I would love to hear about them!

Have A Great Day!

Link Parties
Practically Functional 
The Diary of a Real Housewife     
Adorned From Above   Glitter Glue and Paint