crafts

Easy Decor: Dried Orange Slices

If you buy a few oranges on your next trip to the grocery store, you have the makings for some decor accents.

Dehydrated orange slices are simple to make.  They are a great transitional decoration to use all through the fall and into the Holidays.

The process is so simple that I feel sort of silly telling you how.
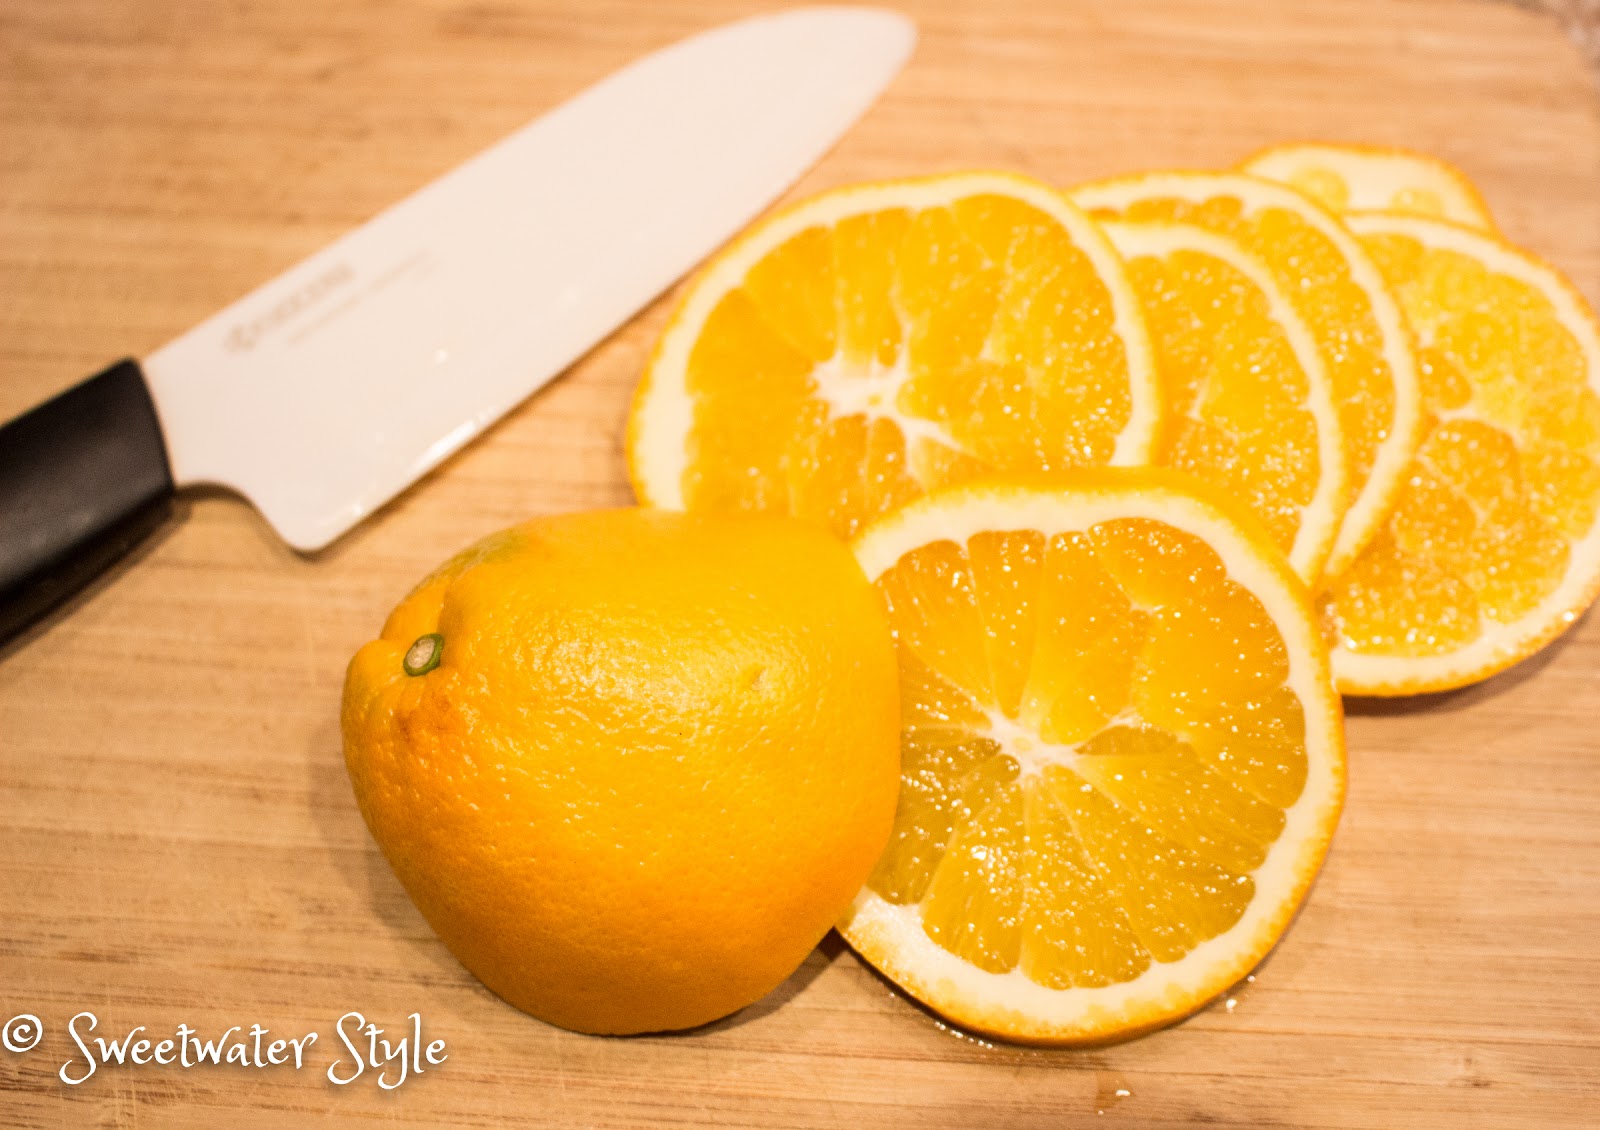
Cut some slices…..

Blot as much juice as possible with a paper towel.

Place the slices in a single layer on baking sheets.

Put them in a 200 degree oven.

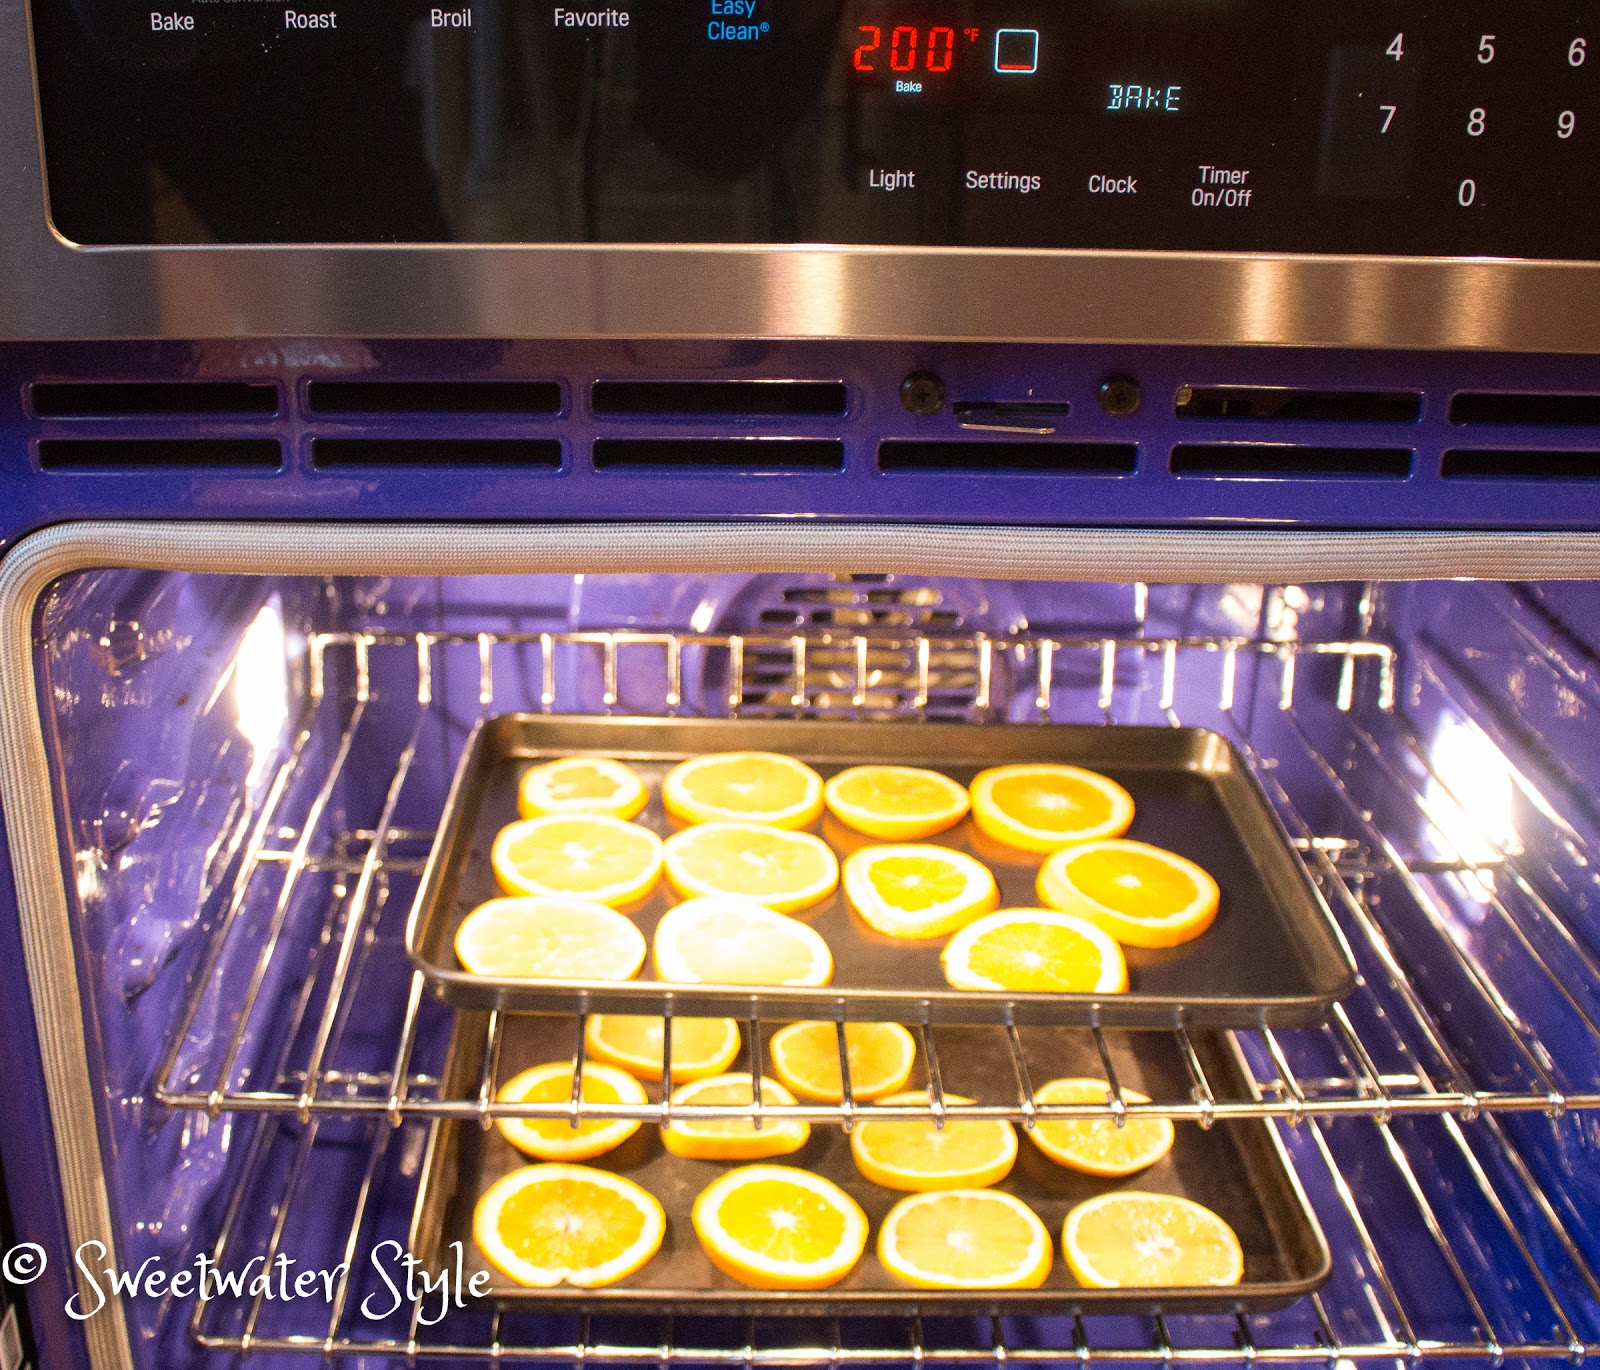
Let them dry for about 2 hours.

Be sure to check them often in the last half hour.  Sometimes a thinly sliced section will burn.

Take the dried slices out of the oven and cool on a wire rack.

That is all there is to it!

The dried fruit looks nice mixed with some cinnamon sticks and baby pine cones.

The little copper strainer is just the right size for the windowsill over the sink.

 I added some pine cones and orange slices to a small potted plant.  It is a nice transitional Thanksgiving vibe.

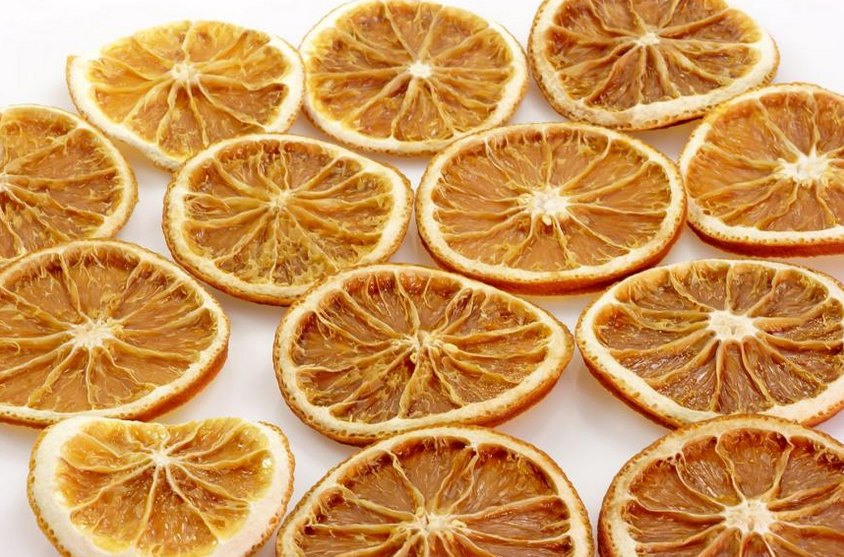
I found these inspirations for other uses of dried orange slices.

source

Source

 The thermometer here reads 19 degrees….a great day to have a slow oven toasting some orange slices.

Have A Great Day!

Link Parties
Tip Me Tuesday

How To Preserve Fall Leaves Repost

The Sweetwater Grandboy has been helping Grandpa S with some raking.
The colors are changing and the leaves are oh so beautiful.
I picked up some really colorful leaves on our walk a few days ago.
I knew I wanted to preserve them.
AND I got to work doing just that.
How? Well let me tell you by reposting the instructions from last year.
 

How to Preserve Autumn Leaves!
A Repost For Your Reading Pleasure!
From Autumn 2015

The weather here this fall has been amazing.  Bright sunny warm days.  For some reason, the leaves on the trees around Sweetwater have not been as colorful as usual.  I suppose there is a scientific reason for that but I don’t know what it is.

Fall leaves that are brightly colored just call to be brought in to the house to use for decorations.

I have memories of classroom art projects that involved trying to save fall leaves.

  • We ironed them between wax paper.  
  • We made leaf prints with paint.  
  • We used color crayons to make leaf etchings. 
  • We pressed leaves in heavy books.

What I really wanted was leaves that look like they are still outside on the tree.
AND……AHA!
This is the technique I tried this year and it comes pretty darn close to actually preserving the leaves.

The leaves in the silver vase have been in water for 2 days…..and you can see how dry and curled they are.

The leaves with the white pumpkins came into the house at the same time.  They got the “magic solution” and you can see they are still nice and soft.

How did this “magic” happen?

The “magic” ingredient is Glycerine.

You can buy glycerine at the drugstore or in craft stores.
I buy mine by the quart from Amazon.

What You Do:
  1. Mix the glycerin and water so that it is one part glycerin and two parts water. …
  2. Pour the solution into a flat pan, place the leaves in the solution, and then put the weight on the leaves to keep them submerged. …
  3. Keep the leaves submerged in the solution for a couple of days.
  4. Dry the leaves gently with a paper towel.

These giant red oak leaves were perfect to show you the process.

  I just put the leaves in the solution and didn’t bother to weight them down.  Every so often I would go and push the solution around with my fingers to make sure the leaves all got covered.

Look how lovely and shiny and soft the leaves are after just 2 days.

They really hold the colors too.

I am not sure what I am going to do with these.  But I am sure to think of something.

 Almost as good as the ones in nature!

Are you wondering how long these will stay looking nice?
I don’t actually know…..but the ones I did two weeks ago still look great.  I don’t know if it matters…..they really only have to last until Fall decor turns to Winter….!

Now…..Are you ready for your chemistry lesson?

Glycerin is a neutral, sweet-tasting, colorless, thick liquid which freezes to a gummy paste and has a high boiling point.
Glycerin can be dissolved into water or alcohol, but not oils.
Many things are able to dissolve into glycerin easier than they do into water or alcohol. This makes it is a good solvent.
Glycerin is a humectant.  That means that it draws moisture from the air.
Glycerin has the ability to make “water wetter” meaning that it breaks the surface tension of water.

Glycerin has lots of uses besides preserving leaves.
If it can make those leaves so nice and soft…..imagine how products containing glycerin will help soften skin and hair.

 This is a nice article with lots of information about glycerine.
Creative Uses For Glycerine 
It is worth checking it out….in fact….I discovered that glycerin mixed with water and heated over a candle flame makes a cool Halloween Fog Machine.  I can’t wait for the UPS guy to deliver my new glycerin supply so I can try this!
Glycerin is also a great additive for Home Made Bubble Solution.
Recipe for Magic Bubbles
1 oz. glycerin
2 oz dish soap (I like Dawn)
8 oz water

Hope you are having a wonderful day!

Preserving Cattails for Indoor Decor!

This post involves blood and gore!
What? 
This is supposed to be about preserving cattails. 
How could that involve blood and gore?
It all started when I asked Mr. S to come along to the countryside to collect some cattails.  
We do this every couple of years.  
 
It is a simple matter of climbing down the embankment and cutting the cattails before they get to “ripe” and start to puff.
 
Well…..
it would be simple enough…..
If the rock retaining wall HADN’T crumbled when Mr. S stepped down….
But Mr. S is tough and stoic!!!!
So even though he fell and twisted his thumb….we kept at it!
Then….we got back in the truck and found even more cattails along the road….
Then many cattails in hand…back home we went.
When John got out of the truck…he asked me what I thought we had walked in to make his pants get all red!!!!!
 YIKES!  He was covered in GORE!
Luckily, when we got to the source of the bleeding…it wasn’t a big deal!
The bleeding stopped in 5 minutes and the little wound was covered with a regular bandage.
BUT….I his boot was filled with blood…
There was a puddle on the floormat in the truck.
Ick…Ick….Ick..
Now on to preserving those cattails…..
I originally posted about this here…PRESERVING CATTAILS TUTORIAL
In order to make the cattails last, you need a very strong “GLUE”.
I have tried a couple of methods.
Hairspray: it isn’t strong enough…and who has it anyway.
ModgePodge:  Works….but has a funny texture because of the way it sits on the surface.

Polyurethane is my go to solution for strong long lasting cattails.

The poly absorbs into the cattail and keeps in all that fluff that is just waiting to burst out,

I used a disposable brush and put on a very thick coat.

 The can of poly that was on the shelf was pretty old…so I feel like this was a great use of the “dregs” in the can.

I left them out in the yard to dry.
Then….I went back into the house to help clean up all that GORE!
So thank you to Mr. S for “taking one for the crafting team”!
AND
wait till you see what I use these very COSTLY cattails for!
More to come soon….

Pillow Knock-Offs Summer Edition

One of my favorite ways to give a quick fresh look to a room is with new decorator pillows.

I must not be the only one….just take a look at HomeGoods or Target and you will see bunches and bunches of pillows that have fun seasonal motifs.

Now….I guess giving a fresh look to a room for around $30 seems like a deal.
But if you follow this blog….you know I think that is WAY too MUCH $$$ to spend.

Come along and I will show you my inspirations from the stores….
and then….
My KNOCK OFF versions of the same pillows.

source

 This nautical inspiration is really fun.  But it made me “Crabby” to think about hand painting something like this.

Source

I love this simple burlap pillow and it is definitely on my to do list….

Target.com

But this charmer from Target is the one that really caught my eye!

Who doesn’t like lobster?

The red color is perfect for the blue and white decor in the lower level.

I used my Cri-Cut and Sure-Cuts-A-lot program to create a lobster stencil!

The stencil is done on canvas with red acrylic paint.

I went all fancy and did red cording around the edge.

The navy and white stripe fabric is left from my DIY Ironing Board Cover.
And….oh my….I actually put a zipper in the back….wasn’t I ambitious?

Since everything I used was already in my “stash”…this cost me nothing.   If you started from scratch, you could probably do this for under $10.

Zazzle.com

I have always loved those vintage postcards that say “GREETINGS FROM….”

Zazzle has done a pillow with this theme.

HMMMMM

I decided to commemorate our fun trip to Savannah, Georgia this past winter.
Some simple Google Image Browsing and I found this great vintage poster.
My apologies….I didn’t save the source….!!!

I used the “Print on Fabric Using Your Printer” technique to create this fun pillow.
Using an machine applique stitch around the print is a clean way to attach the printed fabric.

This next Knock-Off isn’t exactly a Summer theme….
I am continuing to work on the Kate Spade Inspired Guest Bedroom.

source

I came across this pillow when I was looking for ideas.

I had the green and white striped fabric.

It was pretty darn simple to create this knock off.

It has a bed pillow for a form so that it is bigger and fluffier than the inspiration.

The better for cuddling a Grandboy!!!

So the next time you are in a store with a big display of accent pillows…..
Pause….say HMMMMM….and go home and create something!

Have a Wonderful Day!

Link Parties
Coastal Charm 

A Minimal Nod to Valentine Decor

Here is the great question I pondered as I wrote this post title.
Is it Valentine or Valentine’s???
I think it is properly Valentine’s…..but that sounded silly….so I went with Valentine!
All you grammarians out there need to weigh in on this and help me out!
In any case, Valentine’s Day is only 10 days away.
Source
Somehow, in our empty nest, all out red, pink and purple hearts and streamers seem a bit much!  
I have been adding a few touches of the season.  
I am going for a minimalist theme here.
  • The chalkboard easel (a thrift store find) has a simple message.
  • The grocery store bouquet got the addition of some greenery spikes from the dollar store. (hard to tell they are artificial!!)  
  • A little punched tin heart is tied to the handles of the little french flower bucket (from Good Will of course)  The shape of these containers is a favorite of mine.  

This is the vignette in the front hall.  I was on the way out the front door to put the willow heart outside when I had a HMMMM moment.  I propped the wreath at an angle in front of the mirror.

  • The two lanterns have a subtle look with flameless candles that are set to light in the evening.  I especially love the “lovebird” perched on the top.
  • The stack of books is a simple trick.  Good Will books with the covers removed and tied with a burlap knot.

When I scored this small grapevine wreath at the thrift store….I knew it would be a perfect minimalist addition to the copper collection over the kitchen desk.

If one propped up willow wreath is good….two must be better.  I will probably move this outside, but for now this works.

The sunny exposure in the living room is perfect for coaxing these orchids back to blooming.  The silver tray protects the wooden desktop and the little silver containers bring the look together.  I found these little red heart ornaments at IKEA years ago.  The bring just the nicest small nod to the holiday.

 Would you believe these cherries and pomegranates are artificial?

Good looking artificial stuff is something that I always look for at thrift stores.

These cherries have fooled more than one person looking for a tasty treat!

I simply added them to the Baker’s rack in the kitchen for a spot of subtle red!

I still want to do something on the big chalkboard…..maybe replica vintage flash cards…
or…maybe I will keep it simple with something like this.

Did you notice the gorgeous stock photo at the top of the post?
And this one….well
if you hop over to Rekita Nicole’s Website and sign up….she will send you free downloads! 
Just scroll to the bottom of the page and click on freebies!
Oh to be able to make pretty pictures like this….sigh!

Have A Wonderful Day!

Share it one more tie=me